How to use the DNS Zone Editor in cPanel
This article describes how to use the Zone Editor in cPanel to manage custom DNS records.
About DNS records
A DNS (Domain Name System) name server stores DNS records for a domain name. There are many types of DNS records, but some of the most common are:
- A records: An A record associates a domain name (such as example.com) with an IP address (such as 104.218.15.162).
- CNAME records: CNAME (canonical name) records define aliases by associating one domain name with another. For example, you could create a CNAME record for mail.example.com associated with example.com. When a DNS lookup for mail.example.com occurs, it receives in response the associated example.com domain, and subsequently performs a lookup on its A record. CNAME records enable you to define multiple domains without having to specify an IP address for each one.
- TXT records: TXT records can contain any arbitrary text data. They are often used to define SPF (Sender Policy Framework) or DKIM (DomainKeys Identified Mail) settings.
Using the Zone Editor in cPanel
To configure DNS records for your domain, cPanel provides a Zone Editor. The Zone Editor enables you to quickly and easily change DNS records for your domain or domains.
Adding a record
To add a record using the Zone Editor, follow these steps:
- Log in to cPanel.If you do not know how to log in to your cPanel account, please see this article.
- Open the Zone Editor:
- If you are using the Jupiter theme, on the Tools page, in the Domains section, click Zone Editor:

If you are using the Paper Lantern theme, in the DOMAINS section of the cPanel home page, click Zone Editor:
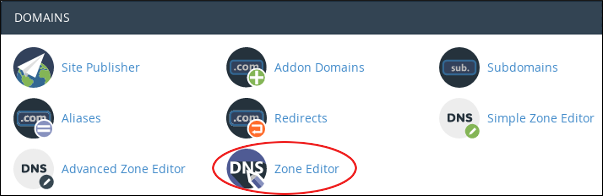
- If you are using the Jupiter theme, on the Tools page, in the Domains section, click Zone Editor:
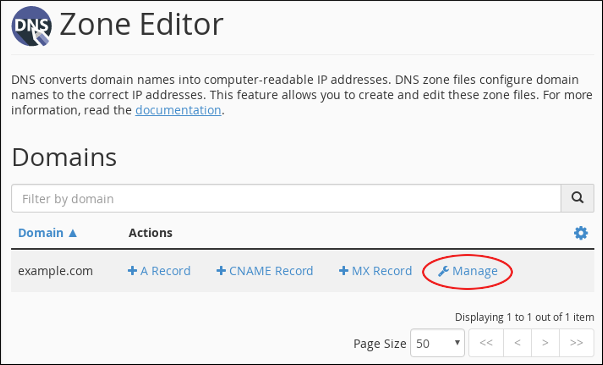
Under Domains, locate the domain for which you want to add a record, and then click Manage:
Next to , click the down arrow, and then click the type of record you want to add:

- In the Name text box, type the fully-qualified domain name (FQDN) for the record.
In the TTL text box, type the time-to-live value in seconds.
If you are unsure of the value to specify, type 14400, which is four hours.- Confirm that the Type list box contains the type of record that you want to add.
In the Record text box, type the value for the record.
- If you are adding an A record, type the IP address to associate with the domain name that you selected in step 2.
- If you are adding a CNAME record, type the associated canonical name for the domain name that you selected in step 2.
- If you are adding a TXT record, type the data for the TXT record.
- Click . cPanel adds the record.
Editing a record
To edit a record using the Zone Editor, follow these steps:
- Log in to cPanel.If you do not know how to log in to your cPanel account, please see this article.
- Open the Zone Editor:
- If you are using the Jupiter theme, on the Tools page, in the Domains section, click Zone Editor:
If you are using the Paper Lantern theme, in the DOMAINS section of the cPanel home page, click Zone Editor:
- If you are using the Jupiter theme, on the Tools page, in the Domains section, click Zone Editor:
Under Domains, locate the domain for which you want to add a record, and then click Manage:
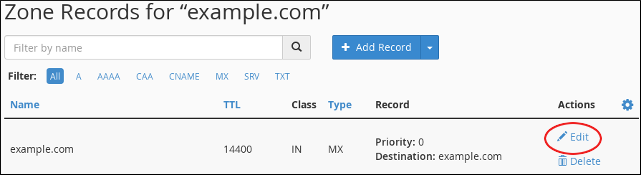
Locate the record you want to edit, and then under Actions, click Edit:
Modify the value or values you want to change, and then click . cPanel updates the record.
Be careful! Modifying some types of records can make your web site inaccessible, prevent e-mail from working correctly, or cause other unintended side effects.
Deleting a record
To delete a record using the Zone Editor, follow these steps:
- Log in to cPanel.If you do not know how to log in to your cPanel account, please see this article.
- Open the Zone Editor:
- If you are using the Jupiter theme, on the Tools page, in the Domains section, click Zone Editor:
If you are using the Paper Lantern theme, in the DOMAINS section of the cPanel home page, click Zone Editor:
- If you are using the Jupiter theme, on the Tools page, in the Domains section, click Zone Editor:
Under Domains, locate the domain for which you want to add a record, and then click Manage:
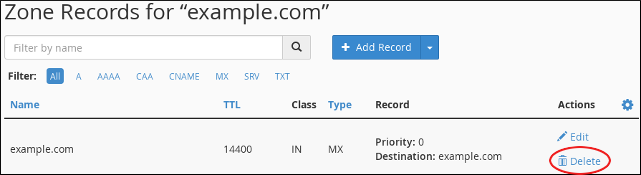
Locate the record you want to delete, and then under Actions, click Delete:
At the Confirm Deletion prompt, click . cPanel deletes the record.
Be careful! Deleting some types of records can make your web site inaccessible, prevent e-mail from working correctly, or cause other unintended side effects.
More Information
For general information about DNS, please visit http://en.wikipedia.org/wiki/Domain_Name_System.
Article Details
- Product: Managed Dedicated Server Managed VPSReseller HostingShared Hosting
- Level: Advanced
Grow Your Web Business
Subscribe to receive weekly cutting edge tips, strategies, and news you need to grow your web business.
No charge. Unsubscribe anytime.
Did you find this article helpful? Then you'll love our support. Experience the A2 Hosting difference today and get a pre-secured, pre-optimized website. Check out our web hosting plans today.