How to install an operating system on an unmanaged VPS
Using the VPS Control panel you can install a fresh copy of your operating system or change to a different operating system. This article provides step by step instructions.
To change or reinstall the operating system for your VPS, follow these steps:
- Log in to the Customer Portal.If you do not know how to log in to the Customer Portal, please see this article.
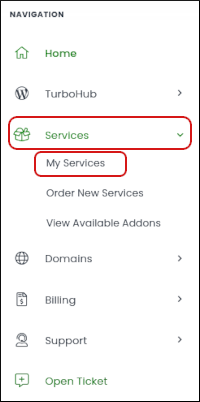
- In the Navigation sidebar, click Services, and then click My Services:
- On the My Products & Services page, locate your unmanaged VPS, and then click :

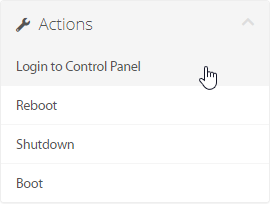
On the Manage page, in the Actions sidebar, click . The Customer Portal logs you in to VPS Control Panel automatically.
If you have previously changed your password in the VPS Control Panel, the automatic login functionality in the Customer Portal does not work. However, you can access the VPS Control Panel without going through the Customer Portal. To do this, follow these steps:
- Use your web browser to go to https://solusvm2.a2hosting.com:5656.
- In the Username text box, type your SolusVM username.
- In the Password text box, type your SolusVM password.
- Click .
On the Home page of the VPS Control Panel, click the button of the server where the new operating system will be installed.

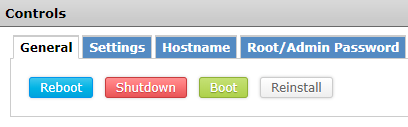
In the Controls section at the bottom of the page, click on the General tab if it is not already selected and then click the button. A list of operating system images is shown.
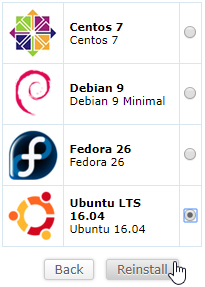
Click the radio button next to the operating system image you want to install on your VPS, and then click the button.
- At the confirmation prompt, click .
- A text box is displayed with an estimate of the time to completion. When the reinstallation process is finished, you can log in to the server.
Article Details
- Product: Unmanaged VPS
- Level: Intermediate
Did you find this article helpful? Then you'll love our support. Experience the A2 Hosting difference today and get a pre-secured, pre-optimized website. Check out our web hosting plans today.