How to set up a remote MySQL connection
This article describes how to use a local computer to connect to your MySQL databases stored remotely on A2 Hosting servers.
Choose a remote MySQL connection method
You can use either of the following methods to access your MySQL databases remotely:
- SSH tunnel: This is the more secure method. You set up an SSH tunnel that forwards a port on your local computer to the remote MySQL server. The MySQL traffic is encrypted by the SSH tunnel.
- Direct connection: You can set up a direct connection between your local computer and the remote MySQL server. Although this method is easier to configure, it is not as secure. Additionally, your local site must have a dedicated (static) IP address. A local site using a dynamic IP address will lose MySQL access when a new IP address is assigned.
If you want to use a direct connection, please open a support ticket on the A2 Hosting Customer Portal at https://my.a2hosting.com. In the ticket, specify that you want to enable inbound access to MySQL port 3306 for your account.
After you have set up a remote MySQL connection, you can use a MySQL client application to manage your databases. For more information, please see this article.
Method #1: Set up an SSH tunnel
The procedure you follow to set up an SSH tunnel between your local computer and the A2 Hosting server depends on the local computer's operating system.
Microsoft Windows
In order to use an SSH tunnel on a computer running Microsoft Windows, you need an SSH client program. A2 Hosting recommends using PuTTY, which you can download here. After you have downloaded the PuTTY executable to your local computer, you can set up an SSH tunnel.
To set up an SSH tunnel on a computer running Microsoft Windows:
- Start PuTTY.
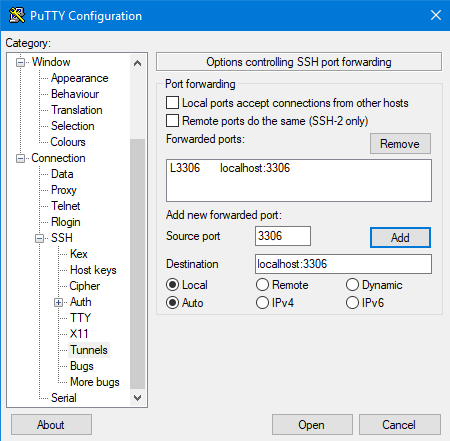
- In the Category pane, expand Connection, expand SSH, and then click Tunnels.
- In the Source port text box of the Port Forwarding section, type 3306. This is the local port to forward.In the Destination text box, type localhost:3306.
- Confirm that the Local and Auto radio buttons are selected.
- Click :
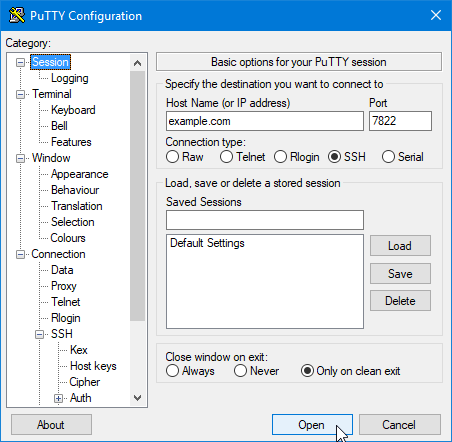
- In the Category pane, click Session.
- In the Host Name (or IP address) text box, type your web site's domain name or IP address.
- In the Port text box, type 7822.
- Confirm that the Connection type radio button is set to SSH.
Click :
- If a PuTTY security alert about the server's host key appears, click .
- When the login as prompt appears, type your A2 Hosting username, and then type your password.
When the remote server's command line prompt appears, the SSH tunnel is established and you can use your MySQL client applications on the local computer.
To verify that PuTTY is forwarding ports correctly, you can click the icon in the top-left corner of the PuTTY session window, and then click Event Log. If port forwarding is working correctly, you see a line similar to:
Local port 3306 forwarding to localhost:3306
Mac OS X and Linux
To establish an SSH tunnel on a computer running Mac OS X or Linux:
- Open a terminal window and type the following command at the command line. Replace username with your A2 Hosting username, and replace example.com with your site's domain name:
ssh -p 7822 username@example.com -L 3306:localhost:3306
- Type your password, and then press Enter. When the remote server's command line prompt appears, the SSH tunnel is established and you can use your MySQL client applications on the local computer.
Method #2: Set up a direct connection
To set up a direct connection between your local computer and the MySQL server, you must first do three things:
- Confirm you will be connecting from a dedicated (static) IP address. If you have a dynamic IP address, such as those commonly provided by Internet Service Providers, you will lose access to MySQL when the IP address changes (for example, after a router reboot).
- Open a support ticket on the A2 Hosting Customer Portal at https://my.a2hosting.com. In the ticket, specify that you want to enable inbound access to MySQL port 3306 for your account.
- Enable remote MySQL access for your IP address in cPanel. For information about how to do this, please see this article.
Example ODBC connection
The following procedure demonstrates how to configure a remote ODBC connection:
- Launch the ODBC Data Source Administrator.
- Click to add a new data source.
- In the Create New Data Source dialog box, click the MySQL ODBC driver.
- Click to start the MySQL Connector/ODBC Data Source Configuration.
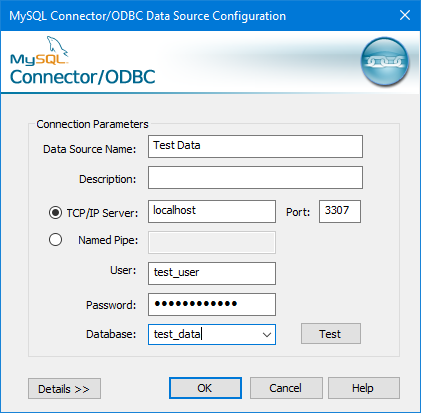
- On the MySQL Connector/ODBC Data Source Configuration dialog box, in the Data Source Name text box, type a descriptive name for the data source.
- Confirm that TCP/IP Server is selected.
- Do one of the following:
- If you are using an SSH tunnel, in the TCP/IP Server text box, type localhost.
- If you are using a direct connection, in the TCP/IP Server text box, type the domain or IP address of the remote server.
- In the Port text box, type 3306.
- In the User text box, type a database username that can connect to the remote database.
- In the Password text box, type the password for the username.
To test the connection, click :

- Optionally, you can use the Database list box to select an initial database for the connection.
- To complete the configuration, click .
Troubleshooting
If you are doing development work on the local computer, a local copy of MySQL may already be running on port 3306. In this case, the following connection error appears:
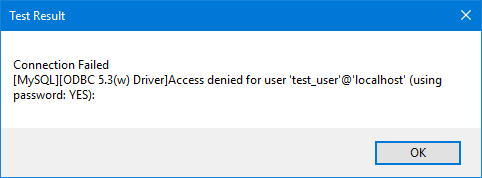
To work around this issue, create a tunnel with an alternate local port, and then connect to the remote MySQL server on that port.
- If you use Putty to create the tunnel, use an alternate Source port on the Tunnels configuration page. In this example, port 3307 is being used:
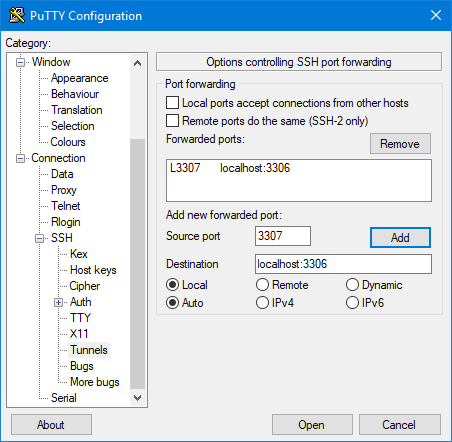
The session configuration does not change.
For Mac OS X or Linux, use the following SSH command to create the tunnel with a local port of 3307. Replace username with your A2 Hosting username, and replace example.com with your site's domain name:
ssh -p 7822 username@example.com -L 3307:localhost:3306
Create the ODBC connection as previously described, but type 3307 in the Port text box (instead of 3306).
- You should now be able to connect.
More Information
To view the online documentation for PuTTY, please visit http://the.earth.li/~sgtatham/putty/0.60/htmldoc/index.html.
Article Details
- Level: Intermediate
Grow Your Web Business
Subscribe to receive weekly cutting edge tips, strategies, and news you need to grow your web business.
No charge. Unsubscribe anytime.
Did you find this article helpful? Then you'll love our support. Experience the A2 Hosting difference today and get a pre-secured, pre-optimized website. Check out our web hosting plans today.