How to back up your email accounts via cPanel’s File Manager
Backing up your email accounts (and messages) via cPanel File Manager is a wise way of preserving your email accounts if you want to archive them, restore them, or take extra precautions before migrating your account.
You can still create a full (or partial) cPanel backup using the Backup tool within cPanel, but often there are situations where you only need to back up email-related data. This tutorial walks you through creating a backup of email data onto your local computer.
Table of Contents
Backing up your email accounts
To back up your email accounts using the cPanel File Manager, follow these steps:
- Log in to cPanel.If you do not know how to log in to your cPanel account, please see this article.
- Open the File Manager:
- If you are using the Jupiter theme, on the Tools page, in the Files section, click File Manager:

If you are using the Paper Lantern theme, in the FILES section of the cPanel home page, click File Manager:

- If you are using the Jupiter theme, on the Tools page, in the Files section, click File Manager:
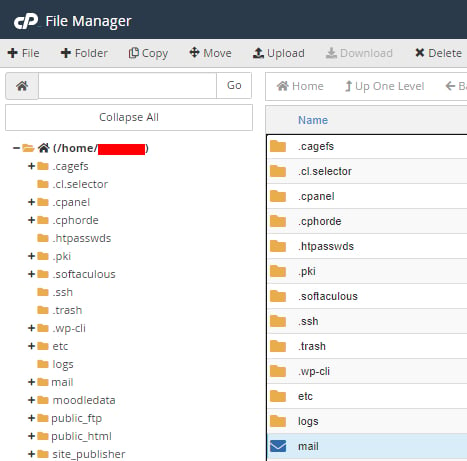
In the home directory of your hosting account (which typically is labeled as /home/(your username)/) find the Mail folder.
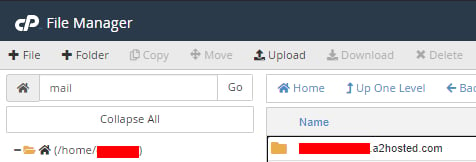
Within the Mail folder, find a folder labeled after your domain name. This will be the file we will compress and backup.
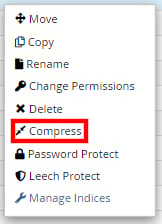
Next, right-click the domain mail folder. Of the several options that appear, click on Compress:
You will then choose which format you would like your files to be compressed in. The following formats are available to choose from:
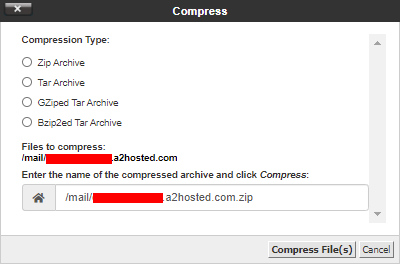
The table below gives a summary of the four compression types and their usage:Compression Type Acronym Usage Zip Archive .zip This type of compression offers maximum compatibility, standard compression, and is typically used by Windows or macOS users. Tar Archive .tar The backup file will not be compressed, and the data is placed into an archive. GZiped Tar Archive .tar.gz Files are compressed using the gzip algorithm (which has nice compression ratios,) and this type of compression is typically used by Linux users. Bzip2ed Tar Archive .tar.bz2 Files are compressed using the bzip2 algorithm. This type of compression offers better compression than GZiped Tar (.tar.gz) but the algorithm is slower. - Select the compression type that best suits your needs, and click Compress File(s).
Your new compressed file will now be listed as one of the available files in that section of File Manager’s directory. Right-click the compressed file and click Download. This will download the compressed file onto your local machine. It is highly advisable to save this file to both your local computer and/or several machines.

To save space on your hosting account, it highly advised that you delete the compressed file within File Manager. Simply right-click the compressed file and click Delete to remove it.
You have now created a backup of your email (and messages.)
To save your entire mail directory, follow the same steps as above, but simply click on Mail in File Manager and not the mail for an individual domain.
Article Details
- Operating System: Linux Hosting
- Control Panel: cPanel
- Product: All managed hosting accounts using cPanel
- Level: Beginner
Grow Your Web Business
Subscribe to receive weekly cutting edge tips, strategies, and news you need to grow your web business.
No charge. Unsubscribe anytime.
Did you find this article helpful? Then you'll love our support. Experience the A2 Hosting difference today and get a pre-secured, pre-optimized website. Check out our web hosting plans today.