How to create a Node.js application with cPanel using the Node.js Selector
The Node.js selector allows you to easily set up Node.js applications with the cPanel graphical interface or using the command line. Use whichever method you prefer.
- app is used for the application root directory and application uri.
- example is used for the username.
- example.com is used for the domain.
- app.js is used for the application startup file.
- My app is used as the description.
- 10 or 11 is the node.js major version number.
Method #1: Setting up a Node.js application with the cPanel interface
To set up a Node.js application using cPanel, use the following procedures.
Step #1: Create the application
First, you must create an application. To do this, follow these steps:
- Log in to cPanel.If you do not know how to log in to your cPanel account, please see this article.
- Open the Node.js app tool:
- If you are using the Jupiter theme, on the Tools page, in the Software section, click Setup Node.js App:
If you are using the Paper Lantern theme, in the SOFTWARE section, click Setup Node.js App.

- If you are using the Jupiter theme, on the Tools page, in the Software section, click Setup Node.js App:
On the Node.js selector page, click to start the application setup:

Fill in the fields on the application setup form:
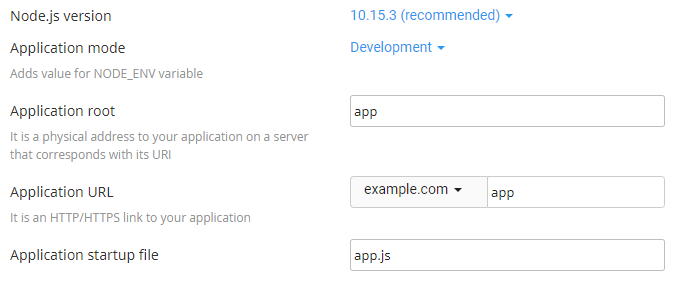
- Node.js version - select your perferred version from the drop down list
- Application mode - choose Development or Production from the list. Development may be chosen initially and changed to production later.
- Application root - the file system location for application files. The entry will be appended to /home/username to form the complete path to the application files in the cPanel home directory.
Typical locations for the application root are /home/username/appname or /home/username/apps/appname. Do not put the application root inside the domain document root.
- Application URL - the address of the application on the Internet.
When you define routes in your application code, you must include the application URL in the route. For more information, please see this article.
- Application startup file - the initial file that will be processed when launching the application.
When the form is complete, click :

The application starts automatically. To view a test page for the application, click :

You should see the It Works! message appear.
Now that a working application is installed, you can enhance the environment with the package.json settings file and the npm package manager. To do this, follow the next two procedures.
Step #2: Create the package.json file
To create the package.json file, follow these steps:
- Open the File Manager:
- If you are using the Jupiter theme, on the Tools page, in the Files section, click File Manager:

If you are using the Paper Lantern theme, in the FILES section of cPanel, click :

- If you are using the Jupiter theme, on the Tools page, in the Files section, click File Manager:
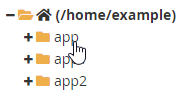
In the left hand column of File Manager, click the text of the application root folder:
Click to create a new file:

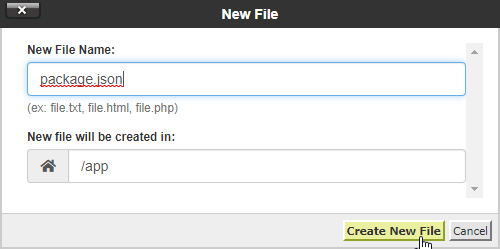
In the New File dialog box, type the filename package.json, and then click :
Right-click or secondary click on the package.json file in the right-hand column of File Manager and then click . An edit dialog box appears:
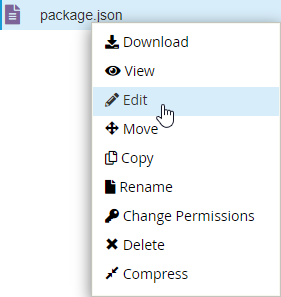
- In the Edit dialog box, click .
Type the following text in the editor screen:
{
  "name": "app",
  "version": "1.0.0",
  "description": "My App",
  "main": "app.js",
  "scripts": {
    "test": "echo \"Error: no test specified\" && exit 1"
  },
  "author": "",
  "license": "ISC"
}
Click to save the file:

Click to close the editor:

Step #3: Install npm
To install npm, follow these steps:
- Open the Node.js app tool:
- If you are using the Jupiter theme, on the Tools page, in the Software section, click Setup Node.js App:
If you are using the Paper Lantern theme, in the SOFTWARE section, click Setup Node.js App.
- If you are using the Jupiter theme, on the Tools page, in the Software section, click Setup Node.js App:
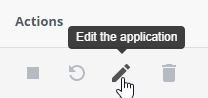
In the Actions column of the Web Applications list, click the pencil icon to edit the application:
Click :

The NPM installation runs and displays a success indicator when complete:

To install packages with NPM and do other command line tasks related to the application, log in via SSH and enter the virtual environment for the application using the command shown in the information box at the top of the application setup page:

Method #2: Setting up a Node.js application using the command line
Users familiar with SSH and the bash shell may find the command line process faster and easier than navigating the cPanel interface. To set up a node.js application from the command line, follow these steps:
- Log in to your account using SSH.
- Create the application with the following command:
cloudlinux-selector create --json --interpreter nodejs --version 11 --app-root app --domain example.com --app-uri app
Change to the application directory:
cd ~/app
Open the vi editor and create the package.json file:
vi package.json
press i to change to insert mode and paste the following text into the editor:
{ "name": "app", "version": "1.0.0", "description": "My App", "main": "app.js", "scripts": { "test": "echo \"Error: no test specified\" && exit 1" }, "author": "", "license": "ISC" }- Press escape followed by : to enter command mode.
- Press x followed by Enter to save and exit the editor.
To install npm, type the following command:
cloudlinux-selector install-modules --json --interpreter nodejs --user example --app-root app
To install packages with npm and do other command-line tasks related to the application, log in using SSH, and then type the following command to enter the virtual environment for the application:
source /home/example/nodevenv/app/11/bin/activate && cd /home/example/app
To control the running state of the application, do the following:
- To stop the application, type the following command:
cloudlinux-selector stop --json --interpreter nodejs --app-root ~/app
To start the application, type the following command:
cloudlinux-selector start --json --interpreter nodejs --app-root ~/app
To restart (stop and start in one step) the application, type the following command:
cloudlinux-selector restart --json --interpreter nodejs --app-root ~/app
- To stop the application, type the following command:
Article Details
- Product: Drive Web Hosting Turbo Web Hosting
- Level: Intermediate
Grow Your Web Business
Subscribe to receive weekly cutting edge tips, strategies, and news you need to grow your web business.
No charge. Unsubscribe anytime.
Did you find this article helpful? Then you'll love our support. Experience the A2 Hosting difference today and get a pre-secured, pre-optimized website. Check out our web hosting plans today.