How to get started with WordPress
You've decided to start blogging, and you want to use WordPress. This article provides what you need to get up and running.
Step 1: Install WordPress
The first step is to get WordPress installed. If you haven't ordered a hosting account yet, this is very easy. When you order your hosting package with A2 Hosting, simply select WordPress - A2 Optimized in the list of auto-installation options. After your account is set up, WordPress will be ready and waiting for you.
If you have already ordered a hosting account with A2 Hosting, there are two ways to install WordPress:
- Softaculous: Softaculous is an automated application installer that A2 Hosting provides with managed hosting accounts. It enables you to install a wide range of applications on your account with just a few clicks, including WordPress. For information about how to install WordPress using Softaculous, please see this article.
- Manual installation: You can install WordPress manually, though this requires some extra configuration steps on your part. For information about how to install WordPress manually, please see this article.
After WordPress is installed on your account, it's time to start making your site your own.
Step 2: Import content (optional)
This step is optional. You may already have existing content that you want to import into WordPress, such as raw text or posts from another blogging application. Unfortunately, because there are a huge number of blogging applications, each with its own storage format, there is no one-size-fits-all solution to importing existing content into WordPress.
Luckily, the official WordPress documentation site provides a comprehensive list of applications and how to import their content into WordPress. For more information, please visit https://codex.wordpress.org/Importing_Content.
Step 3: Customize WordPress
Before you starting creating and posting content, you should do some site customization. WordPress makes this easy with its support for a large number of themes and plugins.
Themes
A theme provides a site's look-and-feel, including fonts, colors, page layouts, and more. There are thousands of themes available for WordPress, both free and paid. To see the wide variety of themes that are available, please visit https://wordpress.org/themes.
After you choose a theme, all you need to do is install it, and your site instantly has a completely new visual appearance. For information about how to install themes in WordPress, please see this article.
Plugins
Plugins extend and enhance WordPress functionality. As with themes, there are thousands of plugins available, both free and paid. There are plugins to help improve security, generate site statistics, optimize image files, and much more. To see the types of plugins that are available, please visit https://wordpress.org/plugins.
Step 4: Create content
You've installed WordPress, and done some basic site customization. Now it's time to get down to the business of actually creating and sharing content!
Posts and pages
WordPress separates content into posts and pages:
- Posts are chronologically ordered on the home page, with the newest posts at the top. Readers can comment on posts, and posts also appear in a site's RSS feed. (RSS is an easy way to notify readers whenever there is new content on your site.)
- Pages contain content that does not change (also referred to as static). As a result, they are not listed by date, and do not appear in a site's RSS feed. Common examples of static pages are “About me” or “Contact us” pages. A blogging site often is composed mainly of posts, and only has a few static pages.
Typically, you'll initially create a few static pages when first setting up your site, and then leave them untouched. On the other hand, you'll be adding and editing new posts frequently.
Creating a post
Let's create a new post for your site. To do this, follow these steps:
- Log in to WordPress as the administrator. The dashboard appears.
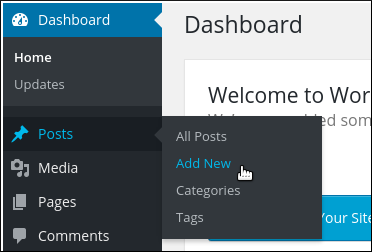
- In the left-side pane, click Posts, and then click Add New:
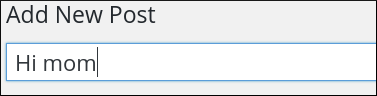
Under Add New Post, in the first text box, type a title for the post, such as Hi mom:
In the large text box, type the content for the post:
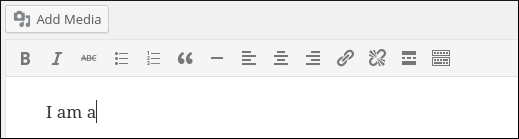 You can use the icons in the toolbar above the text box to add formatting and styling to your text.
The Publish section displays the status of the post:
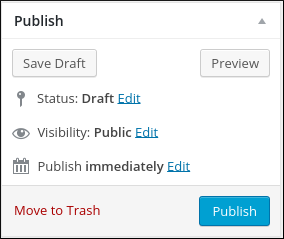
To save the content as a draft and work on it later, click . To preview what the new post looks like, click . Because this is a very simple example, go ahead and click . The post appears on the home page immediately.
The Save Draft feature is perfect for capturing ideas when you're not ready yet to publish a post for everyone to see.
Creating a page
Now that you know how to create and publish a post, let's create a new static page. To do this, follow these steps:
- Log in to WordPress as the administrator. The dashboard appears.
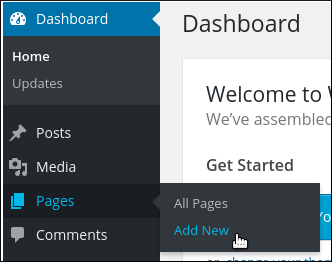
- In the left-side pane, click Pages, and then click Add New:
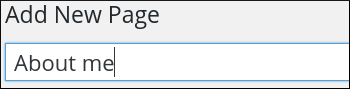
Under Add New Page, in the first text box, type a title for the page, such as About me:
In the large text box, type the content for the page, such as “I am a thirty-something tightrope walker who likes to read Nabokov by moonlight”:
You can use the icons in the toolbar above the text box to add formatting and styling to your text.The Publish section displays what you need to know about the status of this page:
To save the content as a draft and work on it later, click . To preview what the new page looks like, click . Because this is a very simple example, go ahead and click . On most themes, a link to the About me page appears automatically on your site's home page.
Some themes may require some additional configuration to get the About me page link to appear. For example, if you are using the default Twenty Fifteen theme, follow these steps to make page links appear on the home page:
- In the left-side pane, click Appearance, and then click Themes.
- In the Twenty Fifteen area, click .
- In the left-side pane, click Widgets, click Widget Area, and then click .
- Click Pages.
- In the Title text box, type a heading for the pages, and then click . Page links should now appear on the home page.
Step 5: Manage comments
After you post content, you probably want readers to be able to add comments and discuss what you have written. WordPress makes it easy to approve, edit, reply, and do other tasks with reader comments.
For information about how to manage comments for WordPress, please see this article.
Article Details
- Product: All accounts
- Level: Beginner
Grow Your Web Business
Subscribe to receive weekly cutting edge tips, strategies, and news you need to grow your web business.
No charge. Unsubscribe anytime.
Did you find this article helpful? Then you'll love our support. Experience the A2 Hosting difference today and get a pre-secured, pre-optimized website. Check out our web hosting plans today.