


- May 14, 2019
 0
0- by A2 Marketing Team
Page builders are handy tools for quickly creating high-quality sites, both for users new to WordPress and professional developers alike. Unfortunately, they can also get a little pricey if you want to access their most useful features.
However, with the Elementor page builder, you can access a wide variety of pre-built page elements without having to pay a thing. You can smoothly create sites with more than 30 drag-and-drop widgets, and gain even more helpful tools if you upgrade to Elementor Pro.
This post will provide a comprehensive guide to buying and creating a site with Elementor. Even if you’re a complete WordPress beginner, these steps will enable you to launch a professional-looking website quickly. Let’s go!
An Introduction to Elementor: What It Is and Why You Might Want It
Elementor is what’s known as a WordPress page builder. It adds a drag-and-drop interface to the WordPress editor, which enables users to create sites using pre-built elements called ‘widgets’:
Page builders make it much easier to create custom layouts with multiple rows and columns, and to add in special features such as buttons. They also enable you to see exactly what a finished page will look like while you’re editing it.
This is particularly helpful for users who don’t have a lot of experience with code. It helps you add more complex elements to your pages than what’s available in the standard WordPress editor, without the need for advanced technical knowledge.
What’s more, page builders such as Elementor make creating a website fast. Even professional developers sometimes use page builders, because they can create websites more quickly than if they had to put together each page by hand.
To make the process even more streamlined, Elementor enables you to save custom ‘templates’. You can use these to design specific types of content and then add them to multiple places on your site, without having to recreate the design every time. This saves a lot of time for those building large sites, or creating multiple sites for various clients.
Purchasing Elementor: Free vs Pro
There are several other page builders available for WordPress. However, Elementor is particularly appealing because it offers a wide selection of features and options for free.
The free version of the Elementor plugin is available in the WordPress Plugin Directory, and comes with 30 widgets that you can use to build your pages and posts. It’s a simple matter to create functional and attractive sites using this version of the tool.
There is also a Pro version, of course, which provides additional features. It includes over 50 additional widgets, including some that are specifically designed for online stores. It also enables you to edit your theme, as well as build features such as forms, pop-ups, and dynamic content:

When deciding which version to pick up, your primary considerations will be how advanced your pages’ features need to be and how many sites you’re looking to create. If you don’t need the extra widgets, you can stick with the free version. If you want to add more advanced features to your site, however, it may be worth purchasing one of the Pro licenses.
How to Use Elementor to Build Custom WordPress Pages (In 3 Steps)
Perhaps the best way to understand what Elementor is all about is to see how it works in action. Let’s walk through how you can build a new page using this plugin.
Step 1: Launch Elementor from the Page Editor
One you have Elementor installed and activated, you can start using it on any page. To get started, simply open an existing page, or create a new one by navigating to Pages > Add New in your WordPress dashboard.
When you’re in the page editor, you should notice a new blue button at the top of the screen that reads Edit with Elementor. Click on it to launch the page builder:

You’ll now see a blank page and a sidebar containing several widgets, as well as a box labeled Drag widget here:

Now that you’ve launched Elementor, you’re ready to start building your page.
Step 2: Drag and Drop Widgets to Create Your Page
There are a few ways to start creating a new page with Elementor. In the Drag widgets here box, you’ll see two icons: a + symbol, and a gray folder.
Clicking on the folder icon will open the Elementor templates library. Here, you can choose from a variety of pre-built pages or sections to insert, which you can then customize with your own content:

It’s important to note that if you’re using the free version of Elementor, you’ll be limited as to which templates you can access. However, if you’d prefer to build an entirely custom page, you can proceed without using any templates at all.
In that case, you’ll want to click on the pink + icon. You’ll be prompted to select a structure for this section of the page:

After choosing the number of elements and their placement in the row, you can simply drag and drop widgets from the sidebar into the designated areas:

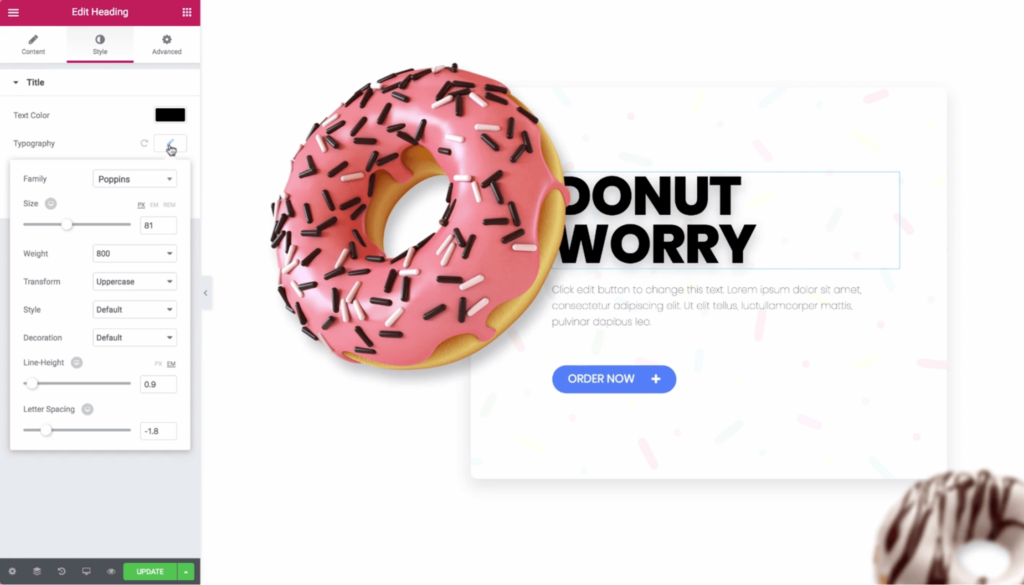
Clicking on a widget will open an editor in the sidebar. There you can add text, images, or other media, change font colors and spacing, and even add motion effects:

Additionally, by clicking on the gear icon in the bottom left-hand corner of the sidebar, you can access additional elements such as the page’s title and featured image:

You can quickly insert these details right in the sidebar. You can also use the eye icon to preview your live page, and click on the History button to review recent revisions and restore previous versions of your page.
Step 3: Publish Your Page from the Elementor Editor
If at any point you need to stop editing your page temporarily, you can save your changes by clicking on the green arrow icon and selecting Save Draft:

You can also click on the Save as Template option if you want to reuse your page structure later in future projects. Once you’re happy with your page and are ready to push it live, you can do so right from the Elementor editor by clicking on the Publish button.
Hosting Your Elementor Website
Choosing a hosting provider is an important part of creating any website. If you’re building an Elementor-based site, it’s a good idea to look for tailored Elementor hosting plans that will support your site effectively.
If you’re in the market for an Elementor hosting plan, you can check out our own Elementor hosting packages. These low-cost plans come with WordPress and Elementor pre-installed:

We’ve also optimized these shared hosting accounts to provide the fastest possible loading times for your Elementor site. Plus, we’ll pre-configure your settings with the most secure options, to keep your site safe.
Conclusion
Choosing the right page builder for your site is no small task. There are several high-quality options out there. However, thanks to its low cost and wide array of features, you can’t go wrong with Elementor.
After installing the plugin and selecting a hosting plan, you can create a custom page in just three steps:
- Launch Elementor from the page editor.
- Drag and drop widgets to create your page.
- Publish your page from the Elementor editor.
Image credit: Pixabay.
