- Sep 16, 2021
 0
0- by Sarojini Nagappan
WordPress comes with a huge theme library that contains thousands of free and paid themes. When going through the process of starting a WordPress website it’s worth trying out a few themes before you settle down with the right one for your WordPress site. This blog gives you a step-by-step guide on how to install a WordPress theme using the WordPress Theme Search or WordPress Upload Theme.
Before You Begin
Before you start installing a WordPress theme, here are a few rules to keep in mind:
- You can install as many themes as you want, but you can only activate ONE theme at a time. A newly installed theme is activated automatically, so you can quickly start customizing this theme according to your preferences.
- You need to have an administrator account to install WordPress themes.
- You don’t always have to opt for premium themes. Choosing between a free or premium theme depends on the nature of your website and how much you want to invest. If you are looking to make a start with little overhead investment there are so many great free themes out there that don’t require any money upfront.
- Some themes come with demo content. Contact the theme developer to understand the demo content and its limitations if you don’t see any demo content.
Looking to stop here and read a guide on WordPress themes before learning how to install them? Here are some great resources on WordPress themes:
- Installing Customized WordPress theme using FTP
- How to change WordPress theme manually using phpMyAdmin
- How to manage themes on Managed WordPress hosting
Installing WordPress Themes using WordPress Theme Search
Step 1: Login and Access WordPress Theme page
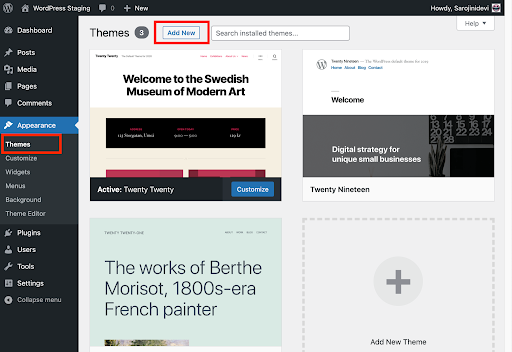
Start by logging in to your WordPress site with an administrator account. On the Dashboard in the left sidebar, click Appearance, and then click Themes. Click on the Add New button on the Themes page.
Step 2: Search for a WordPress Theme
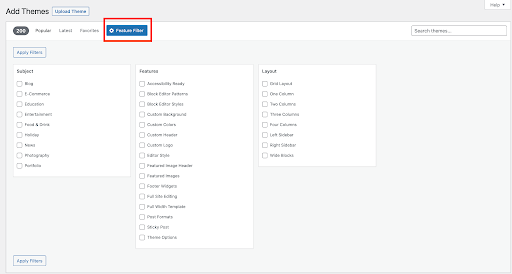
You can start your search for a specific theme here. There are different categories to look through such as Popular WordPress themes, Latest WordPress themes, or Favorite WordPress themes. You can also use the Feature Filter to sort themes by subject, specific features, and layout. Have some fun here, this is when you really get to hone in on the look and feel of your WordPress site!

Step 3: Install and Customize WordPress Theme
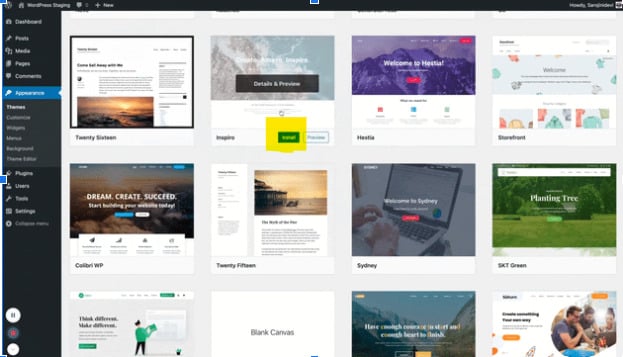
Once you’ve found the right theme for you it’s time to start the installation process. To install the theme, click on the install button. You will see WordPress themes displayed according to the selected filters. Hover on the image to reveal the install button, preview button, and details button.
Once the theme is installed, we recommend you install the required plugins for your chosen theme. Click on Begin installing plugins link if you would like to install the plugin. Next, click on the Customize button and follow the on-screen instruction to set up your theme.
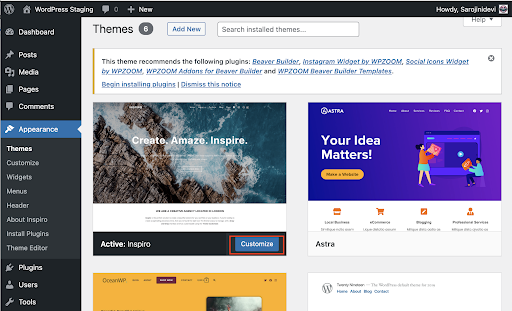
Now you’ve successfully installed your WordPress theme using WordPress Theme Search! If you’re interested in learning how to upload a custom theme to your WordPress site keep reading for a step-by-step guide.
Uploading Custom Theme to WordPress
If on your theme search you decided to purchase a customized theme, then you may need to take a different approach when trying to install it. Keep reading for step-by-step instructions on what to do when uploading your theme.
Step 1: Downloading Your Theme
Step one is purchasing the perfect theme for your site. Make sure you download the customized .zip theme file to begin. The theme used in this blog is from https://zakratheme.com/.
Step 2: Install and Customize WordPress Theme
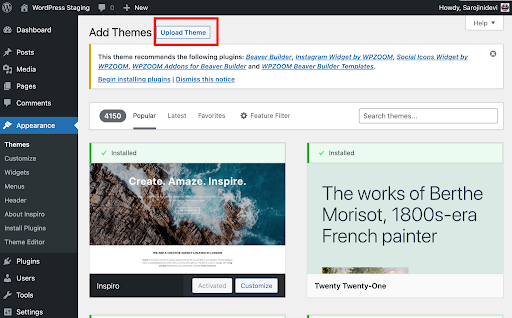
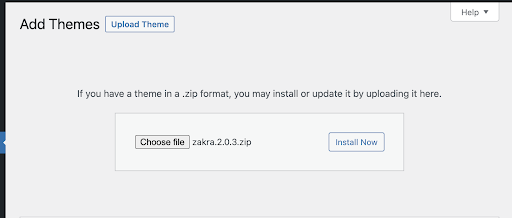
Next, log in to your WordPress site with an administrator account. On the Dashboard in the left sidebar, click Appearance, and then click Themes. Click on the Upload button on the Themes page. Next, choose the theme file you downloaded earlier, and then click Install Now.
Click on the Activate link to activate the theme.
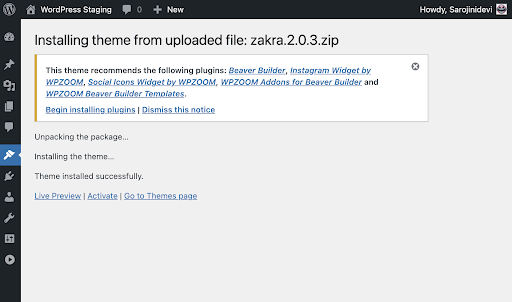
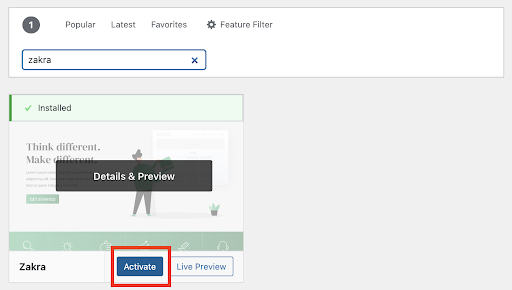
If you have accidentally closed the installation screen above, you can also search for the theme using the search box and click on Activate.
Step 3: View and Customize the Theme
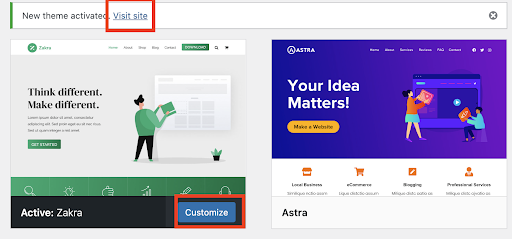
The newly installed theme will be listed on the Themes page. If you would like to see the new look of your site then click on the Visit site link just above the theme listing. Some themes may require you to install additional plugins, so now is a great time to view the details of the plugin and install them accordingly.
Conclusion
Although there are many WordPress themes and plugin options, it’s important to always check new plug-in compatibility with the various plugins you already have installed on your site, WordPress versions, and security features. It’s also important to understand that if you have any existing content, you should always back up your WordPress site before installing the theme.
If you’re looking to get started on a new WordPress website and don’t have a hosting company come try A2 Hosting! With 24/7/365 support, 99.9% uptime, and amazingly priced Managed WordPress plans, it’s never been easier to thrive online! Feel free to contact our sales team today with any questions.
