


- Aug 01, 2017
 0
0- by A2 Marketing Team
Microinteractions are an often overlooked part of web design, but they’re also powerful tools that can help you increase your site’s usability (and they serve the same purpose in apps). The real questions are, which parts of your site would benefit from using them, and how can you go about making the appropriate changes?
Fortunately, you don’t need to be a professional designer to implement microinteractions on your pages (or to appreciate their usefulness!). Moreover, adding small animations to a few of your elements can have a sizeable impact on their user-friendliness. It can even help you generate leads and increase conversions.
In this article, we’re going to introduce you to what microinteractions are and how they can help you. Then we’ll tell you how to implement them on your site in three simple steps. Let’s get to work!
What Microinteractions Are, and How They Can Help You
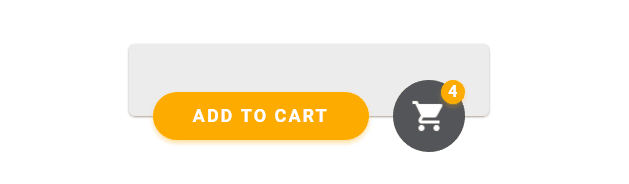
Microinteractions are subtle animations that play when you mouse over, click, or otherwise interact with particular website elements. For example, here’s an animation that increases a shopping cart counter each time you add a new product to the cart:
At first glance, it might seem like microinteractions are just there to add a bit of flair to your pages, but that’s by no means all they do. In fact, these small animations can make your site more user-friendly. Let’s talk about why that is:
- More visual feedback. When implemented well, microinteractions provide users with visual feedback to help them determine how to use specific elements. Take the button we showed you earlier, for example – its animation lets visitors know that it’s something they can click on.
- Better usability. In other words, by including more visual feedback you can make the purpose of your website’s components more obvious to visitors. The site becomes more usable overall when it is easy to interact with in an intuitive way.
That last point is perhaps the most important when it comes to microinteractions. If used correctly, they should make your pages easier to use without you having to explain how each element works. Plus, by keeping your animations simple, you ensure they don’t take away from the rest of your site’s elements (hence the term “micro”).
If you’re still on the fence about implementing microinteractions, check out this roundup of outstanding examples. It shows you some of the most creative uses for elements like this, and should help you determine which ones would be suitable for your site.
How to Implement Microinteractions on Your Site (In 3 Steps)
Animating a web element can be complicated, and in most cases you’ll need to do a bit of coding to get there. However, these days you can get a lot done without being a developer or a designer. With that in mind, let’s talk about the simplest method of implementing microinteractions on your website.
Step #1. Pick Which Site Element(s) to Animate
When it comes to microinteractions, it’s important to keep in mind that they’re not a good fit for every type of element. They work great with buttons or forms, for example, but you might not have as much success if you try to animate a header or a large image.
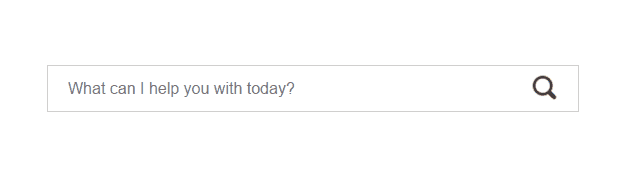
Take the above search bar animation as an example. In this case, the animation is exceedingly simple – the descriptive text disappears once you click on it, and the bar glows to let you know you can use it. It’s a small detail, but it still increases usability (while looking cool!).
Here are a few tips for picking the right elements to animate on your site:
- Stick to items that users can interact with, to avoid confusing them.
- Consider whether there are any elements on your site that visitors might not know how to use. Those are the perfect places to add microinteractions.
- When in doubt, stick to the classics such as buttons, search bars, and form fields.
Once you have an element in mind, it’s time to start considering what type of microinteraction you want to add to it, which brings us to step number two.
Step #2. Decide What Type(s) of Microinteractions to Add
We’ve already mentioned this a few times, but it’s worth repeating: the best microinteractions are all about increasing user-friendliness. In practical terms, that means you need to think long and hard about what kinds of animations to implement.
Take a look at the search bar animation below. Unlike the example in the first step, this microinteraction doesn’t improve usability:

In this example, the search bar disappears if you move your mouse outside it, which can be annoying to some users. The only scenario where this concept works is if you’re working on a responsive design. Even then, your search bar should probably be integrated into a menu to avoid taking up too much space.
If you want your microinteractions to favor substance over style, keep these two simple tips in mind:
- Focus on highlighting how a particular element works (check the example in step one to see this in action).
- Use animations to signal success when a visitor uses elements correctly.
Sticking to these two principles should ensure that your animations don’t distract users from the rest of your site’s elements. Plus, it’ll make your users’ lives easier.
Step #3. Use CSS to Animate Your Site’s Elements
Cascading Stylesheets (CSS) is a language that enables you to style your HTML documents. Moreover, its most recent versions also provide you with the option to animate your elements, and that’s exactly what we’re looking for.

Keep in mind that while there are plenty of languages you can use to get the job done, CSS is the easiest of them to learn. Plus, most modern browsers support its latest versions, and you can get a lot done with it without slowing down your site.
If you’re new to using CSS, you’ll want to check out these resources on its animation and transition properties. Then, once you feel comfortable with those, move on to this CSS animation tutorial.
It’s going to take some studying to get where you want to be, but the results can be amazing.
Conclusion
If used correctly, microinteractions can have an enormous impact on your site’s usability without detracting from its content or design. The secret is to focus on making your microinteractions work for you by helping to guide your visitors along, rather than to just be decorative. That way, your visitors won’t be at a loss as to how they should interact with any of your site’s elements.
Let’s recap the three steps to implementing microinteractions on your site:
- Pick which element(s) you want to animate.
- Figure out what type(s) of microinteractions to add.
- Use CSS to animate your website’s elements.
Image credit: Pixabay.
