- Nov 14, 2018
 0
0- by A2 Marketing Team
Choosing a theme you like is an excellent way to quickly implement your desired look on your WordPress website. However, if you use a popular theme, your site could end up looking like many others. Therefore, it can be important to change up your theme, if you want to achieve a unique appearance.
Fortunately, in WordPress you can edit your site’s theme using Cascading Style Sheets (CSS). CSS is like an overlay, which affects your site’s appearance without changing the underlying code of the platform or your theme. This means you can try out different looks, without risking that you’ll break your site or accidentally delete a crucial part of its theme.
In this guide, we’ll go over some of the basic ways you can style your WordPress pages using CSS. Let’s get started!
What CSS Is and How It Works
As we mentioned, CSS is a way to edit your WordPress site’s appearance without affecting its underlying structure. You can think of this like painting a house – you can achieve very different looks on the same house by painting a mural versus shades of purple.
The benefit of using CSS to edit your site’s theme is that you can achieve a unique look. The same theme may be in use on hundreds of sites, after all. Most themes come with a customizer, but its options will be limited. However, with CSS, you can make dramatic changes to help your site stand apart from the rest.
The good news is that it’s relatively easy to learn CSS – and definitely simpler than building a custom theme. Many sites offer free CSS tutorials, such as W3Schools and Codecademy. We’ll also be demonstrating a few of the things you can do with CSS in a moment.
Note that throughout this article, we’ll be using the Additional CSS editor in WordPress. This enables you to change your site’s CSS without touching your theme’s files. It’s best to avoid directly editing those files, because if you make a mistake, you might accidentally destroy an important part of your site.
However, you should also be aware that any code added to the Additional CSS editor will be overridden if you ever change themes – we recommend always using a child theme if you’re planning on implementing any code changes. Even so, it’s always wise to keep a copy of any CSS changes you make to your site, just in case the worst happens.
3 Ways You Can Use CSS to Style Your WordPress Website
Now let’s review some of the ways you can change your site’s look with CSS. This section is meant to give you an idea of what it’s possible to do using CSS – so don’t be worried if you feel overwhelmed at first. With a little practice and patience, you’ll find yourself a CSS pro in no time.
1. Edit Your Site’s Fonts
Just like changing the font in a Microsoft Word document, you can change your website’s typeface using CSS styles. The ‘font’ is the style of text you use, such as Arial or Courier.
A ‘font family’, on the other hand, is the broader type of font style, such as serif, non-serif, or cursive. You’ll always want to set a font family, which you can think of as a backup. If for some reason the font you choose is not available on a specific browser, it will load something else from the same font family instead.
Changing your site’s font can really broaden your options. To get started, you can add Google Fonts to your WordPress website by first selecting an option from the main website:
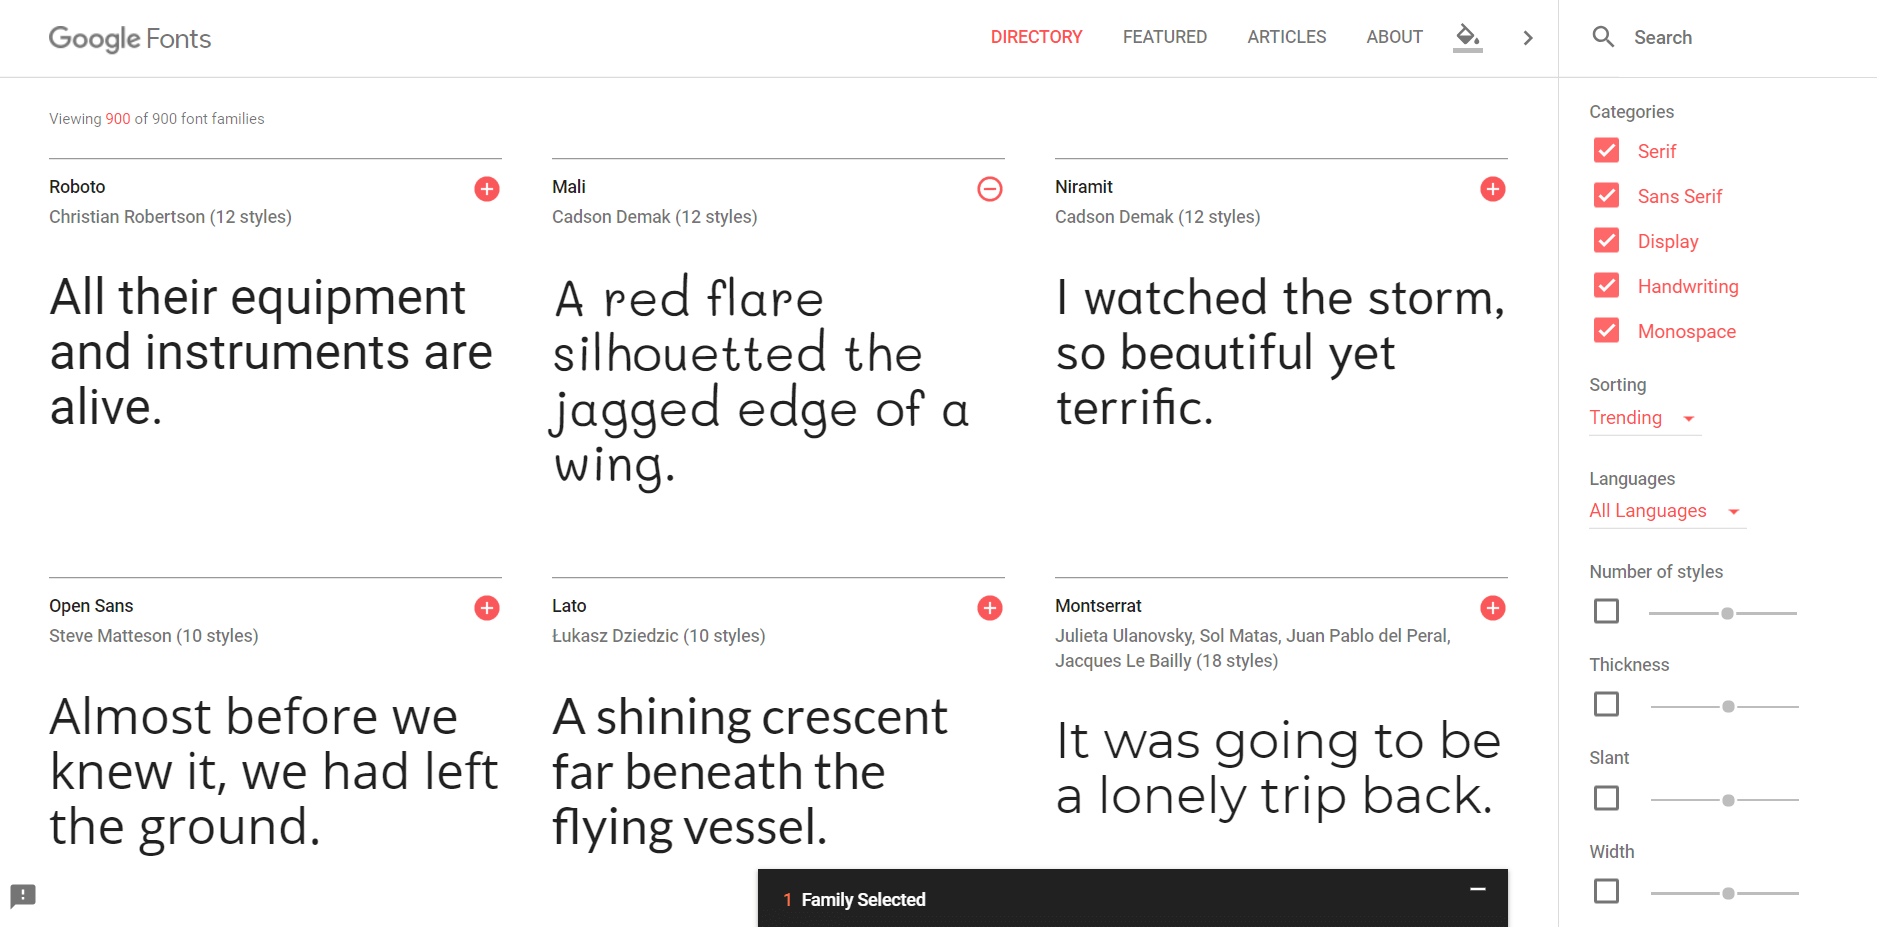
Next, click on the Family Selected window, and copy the code listed under Specify in CSS:
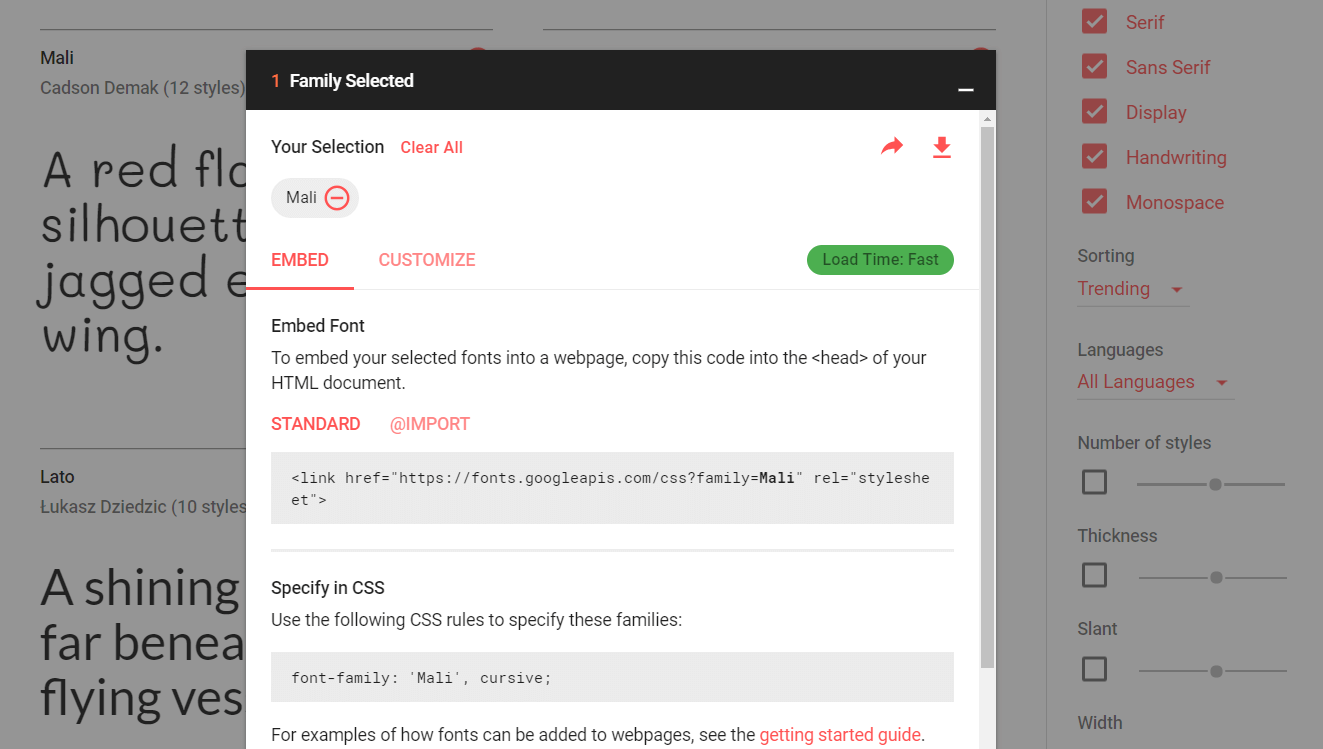
Then head to your WordPress site’s dashboard, and visit Appearance > Edit CSS. This is how you access the Additional CSS editor, where you’ll be placing all of your CSS changes. Paste the copied line of code into the empty field:
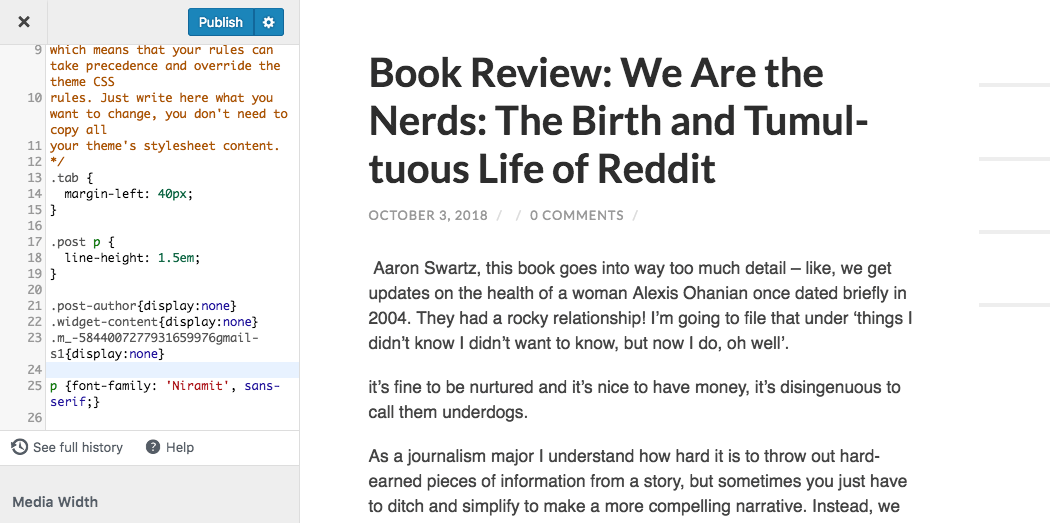
Next, wrap the code in brackets and place a CSS selector at the front. So, for example, to change the font for all paragraphs on your site (CSS selector “p”), your code would look like this:
p {font-family: ‘Niramit’, sans-serif;}
This also means you can pick custom fonts for various elements on your site. We’ll talk more about how to do that in the next section.
2. Edit Text Size and Color
In addition to your site’s font style, you can also change the color and the size of text using CSS. This type of editing can be applied site-wide, but you’ll probably want to target specific elements instead. For example, you can define a particular style for your site’s headers.
In WordPress’ visual editor, you can choose from different header styles:
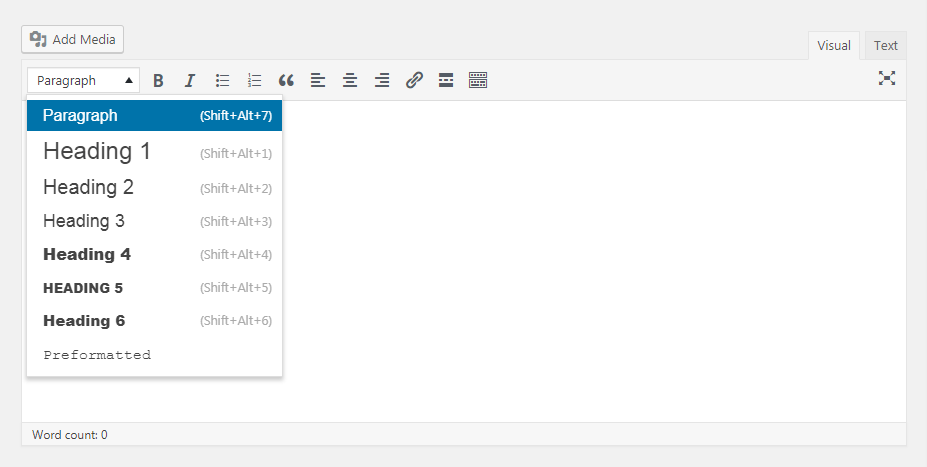
This drop-down menu is actually applying an HTML tag to your text – <H1> for Header 1, <H2> for Header 2, and so on. Each tag can be individually modified using CSS.
Keep in mind that CSS changes can be ‘stacked’ or combined by adding a semicolon after every element. So if you wanted to make your H1 tags black, cursive, and 30 pixels tall, you could add this code to the Additional CSS editor:
h1 {color: black; font-size: 30px; font-family:cursive}
After you save this, any text on your site with an H1 tag will automatically adjust:
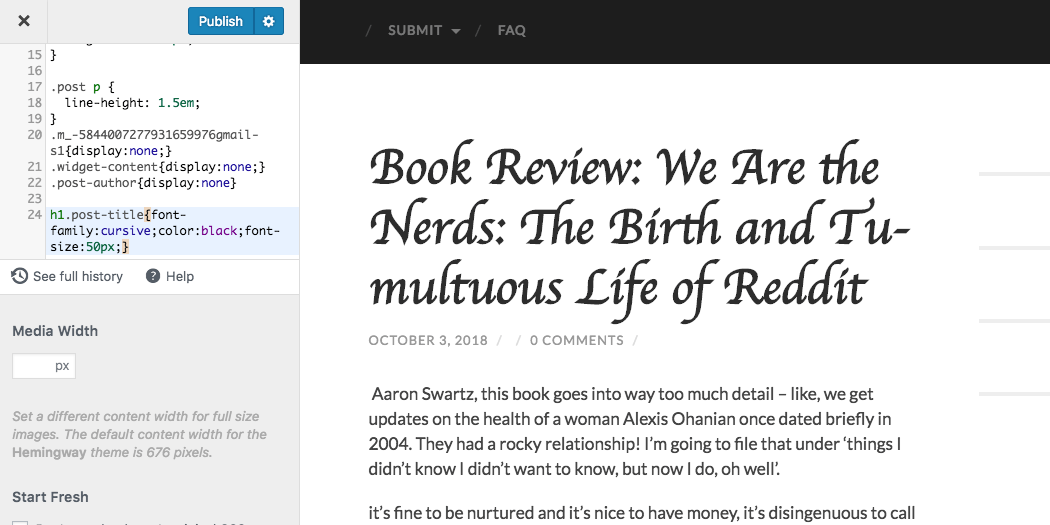
You can use this technique to style any type of text on your page, once you find the appropriate CSS selector. Links use the selector “a”, for example, and the body text of your pages is represented by the selector “body.”
You can also use the universal selector, an asterisk (*), to make site-wide changes. If you create multiple rules that could apply to the same element, CSS hierarchy dictates that the most specific rule will always take precedence.
3. Add a Background Image
By default, your site’s background will often be a solid color (depending on your theme). However, by using CSS, you can add a custom image instead. You can also use CSS to adjust your background image’s opacity, size, placement, and more.
In fact, you can even set a color to display underneath the background image. So if you want, you can experiment with placing a transparent photo over differently-colored backgrounds, until you get the effect you want.
To add a background image this way, you’ll first need to find an image you like and copy its URL. It’s best practice to upload this image to your site’s Media Library, so you have full control over it.
Next, add a line of CSS code to your Additional CSS editor. It should look like this:
body {background-image: url(“image-URL-here”)}
Make sure to keep the quotation marks, and only replace the placeholder text image-URL-here with the actual link. After saving this change, your background image should appear:
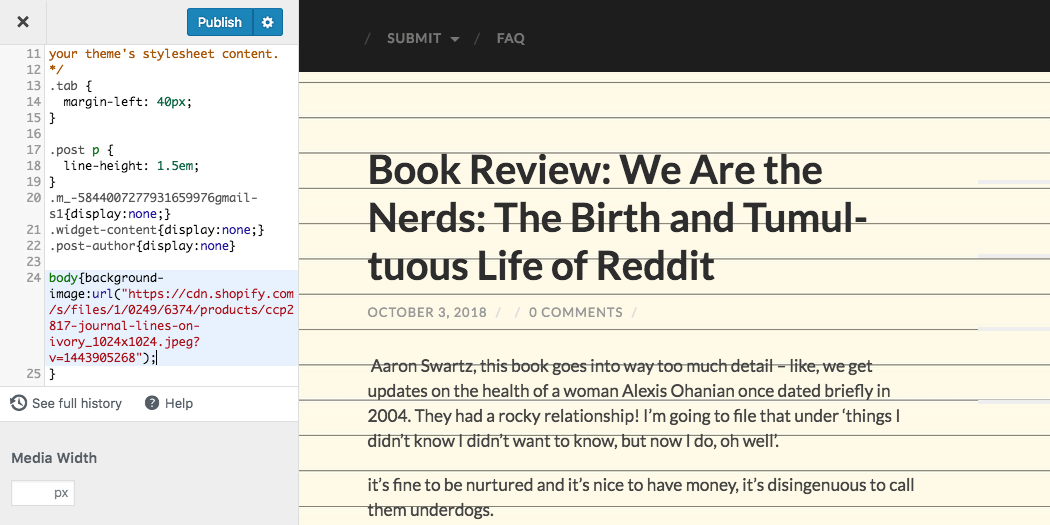
In addition, you can set a background color, and experiment with background blend modes for different effects. For example, let’s see what happens when the blend mode is set to “lighten”:
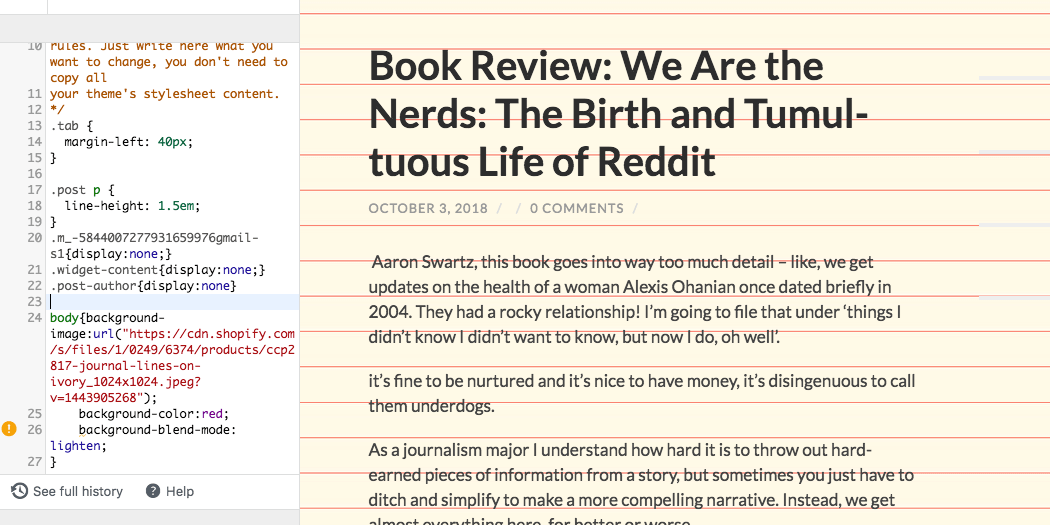
As you’ll notice, the lines on the loose-leaf paper in the background changed from black to red. You can experiment with other background image manipulations as well, such as forcing the image to repeat.
Conclusion
If you want your WordPress site to look unique, you can customize its appearance by editing your theme’s CSS. All you have to do is use the Additional CSS editor, which lets you easily change your site’s look without any risks. You can even learn how to target any element on your site by browsing free CSS tutorials on the web.
Some of the ways you can change up your site’s look using CSS include:
- Changing the font: You can choose one of the hundreds of Google Fonts available, or go with something simple.
- Edit text size and color: This is especially important for defining custom headers, which can really make your site pop.
- Add a background image: There’s no limit to how you can style your site’s background using CSS.
Image source: Pexels.
