Nameservers: What Are They And How Do They Work?
If you manage your own website, you may have run across the term “nameserver”. However, you might not have any real understanding of what one is or how it works. As it turns out, knowing a little about this concept can come in handy for managing your site.
Put simply, nameserver helps browsers make connections between URLs and websites. They’re incredibly important, as without them, we would have to memorize IP addresses in order to access websites. Once you understand the basics of nameservers, you’ll be able to set up a new one if the need arises.
In this post, we’ll explain what nameservers are, what they do, and how to set one up for your domain name. Let’s get started!
An Introduction to Nameservers (And How They Work)
Nameservers are put to work every time someone accesses a website, but many people have very little understanding of what they actually are. To understand this concept, you’ll need to consider what happens when a website is visited.
As you’re probably aware, every device connected to the internet can be identified using a unique IP address. Nameservers are part of a large database called the Domain Name System (DNS), which acts like a directory for devices and the IP addresses attached to them.
What nameservers do is use this information to translate domain names into numerical IP addresses – the language our computers understand. This process works so quickly that it’s almost never noticeable. You simply type in a URL, the nameserver lets your browser know where that website is located, and the desired page loads.
Without this system, we’d have to type lengthy IP addresses into our browsers every time we wanted to open a website. Therefore, the service provided by nameservers is invaluable. The term ‘nameserver’ can be used to describe any server that has DNS software installed. However, it usually refers to a server owned by a web host, which is used to manage customer domain names.
Why You May Want to Register Your Own Nameserver
In most cases, you’ll never need to do anything with the nameservers attached to your site. However, there are several instances in which you may need to register a custom nameserver – which you can use to configure the way your registered domain name information is displayed.
For example, you may own a domain that was purchased from a different hosting company than the one you now use. In this scenario, setting up a custom nameserver will help you develop a stronger, more individual brand identity – rather than simply using the one attached to your host. This may also become necessary if you have a reseller hosting or Virtual Private Server (VPS) account.
Whatever the reason, there are a number of benefits to registering your own nameserver:
- It’s easier for your reseller clients to remember your nameserver. Custom nameservers are associated with your own domain, instead of your web hosting company’s. Using the same domain for both your website and nameserver can also provide your customers with a greater sense of security.
- Changing your hosting provider is simpler if you have a custom nameserver, especially if you’re using a reseller account. That way, your customers won’t need to update their own nameservers.
- In addition, registering your own nameserver also means you can avoid giving away third-party details to your clients.
Custom nameservers are optional, but having one can be beneficial (especially if you operate a website for business or reseller hosting). In the next section, we’ll introduce two of the ways you can get access to one.
How to Set Up a Nameserver for Your Domain (2 Options)
Fortunately, setting up one or more nameservers for your domain is relatively straightforward. Before we get started, it’s important to note that DNS changes can take up to 24 hours to take effect. However, you can generally access them before that if needed.
Option 1: Change Your Existing Nameserver
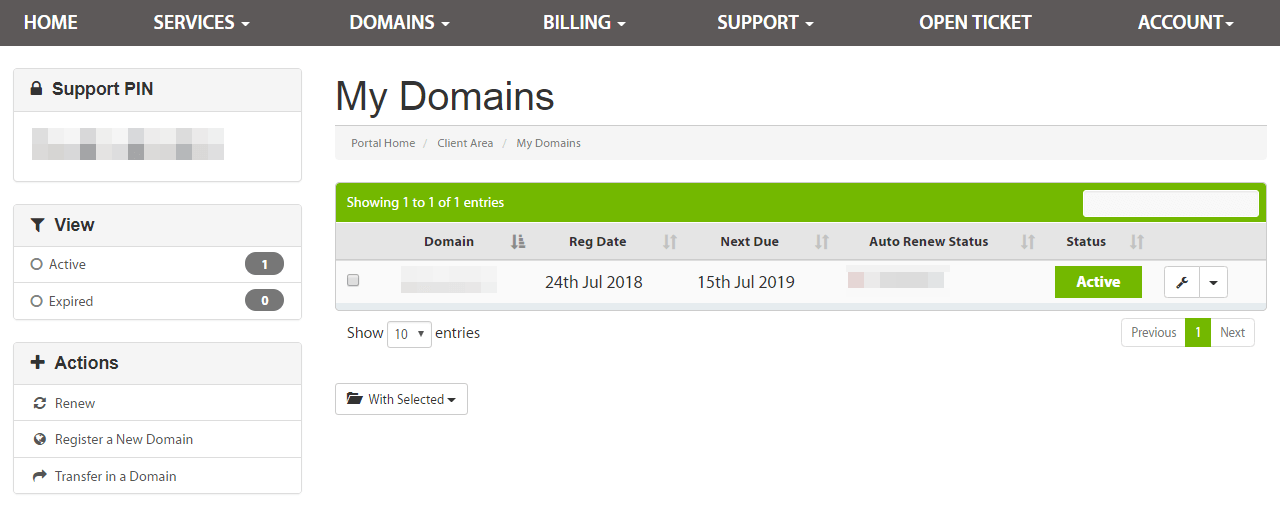
First, we’ll talk you through how to change your existing nameserver, using your A2 Hosting account. After logging in, navigate to Domains > My Domains:

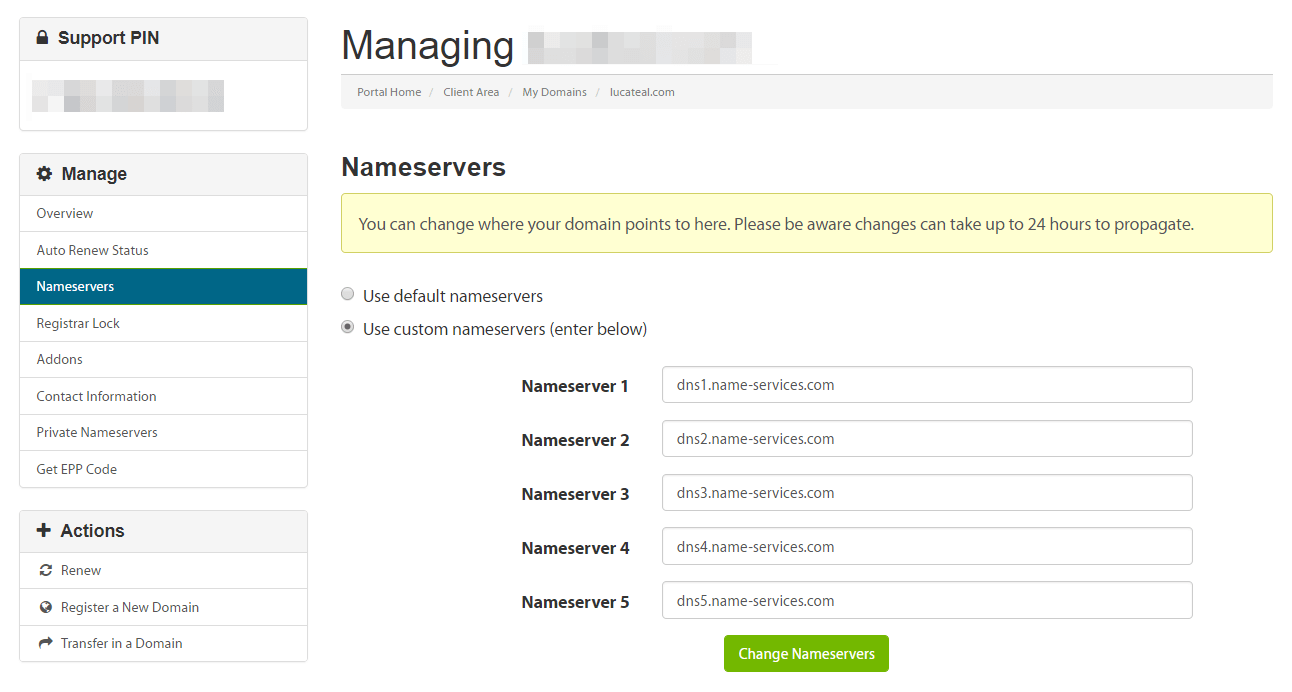
You’ll then be able to select the domain you want to use. On the following screen, click on Nameservers under Manage:

From here, you’ll see options to Use default nameservers or Use custom nameservers. Bear in mind that in order to use the A2 Hosting customer portal to manage DNS settings, you must select the default nameservers.
If you want to use custom nameservers, on the other hand, enter their names into the fields below. Of course, you’ll need to have one or more nameservers set up and ready to go. If you don’t, you can use the next method instead.
Option 2: Set Up a Custom Nameserver
Now, let’s look at how to set up a brand-new custom nameserver for your site. For example, if your domain is www.example.com, you could create custom nameservers called ns1.example.com and ns2.example.com. This option is most often used if you have a reseller or VPS account.
Setting up a custom nameserver is a two-step process. First, you must verify whether you have the correct ‘A records’ in place. If you have a reseller hosting account, you’ll need to create the necessary DNS A records. If you have a managed VPS account with A2 Hosting, you don’t need to add A records, as they’ve already been set up. However, it’s important to ensure that your A records are properly configured.
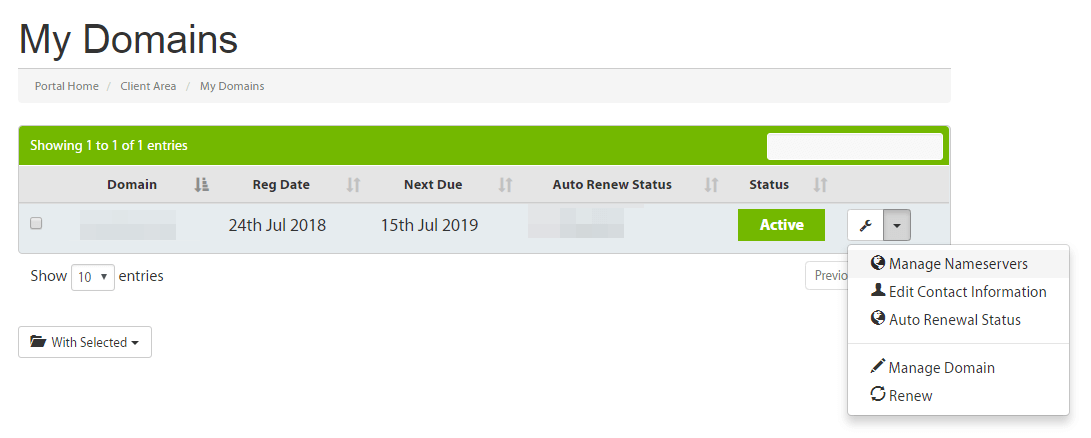
Once you’ve done that, you can go ahead and register the nameservers you’ll need. As before, navigate to the Domains tab in your customer portal, and then click on My Domains. Select the down arrow next to your domain, and you should see an option to Manage Nameservers:

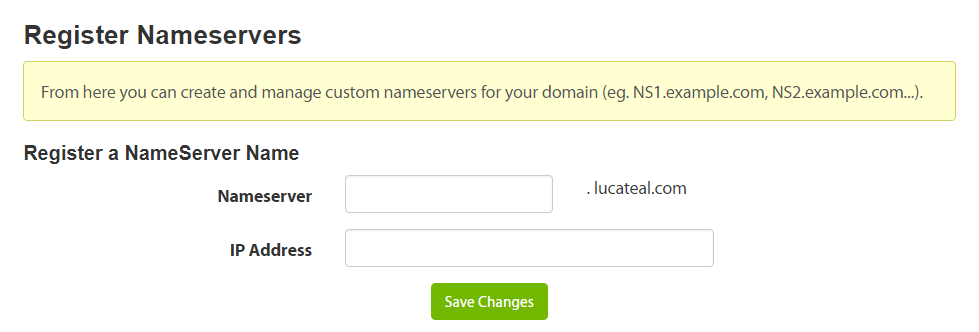
Next, select Private Nameservers from the Manage sidebar. If this is your first time registering a nameserver, enter a name under Register a Nameserver Name:

This is usually “ns1”, since nameservers tend to use names like ns1.example.com. You can then add the IP address associated with the nameserver in question, and save your changes. To add more than one nameserver, simply repeat the process.
Nameservers Conclusion
Nameservers are essential. Without them, we would have to remember IP addresses in order to access websites. Nameservers work so quickly that you and your visitors are unlikely to know they’re even there, and in most cases you won’t need to adjust them. However, there are times when you’ll want to create your own nameservers.
To do that, you can:
- Change the existing nameservers attached to your domain.
- Set up custom nameservers for reseller or VPS accounts, after checking your A records.
Need Domain Management?
A2 Hosting offers a full array of domain management options, from registering a domain to helping you manage multiple domains for your business or clients. Click Here to learn more.
Image credit: Pexels.


