How to configure custom name servers
If you have a reseller, managed VPS, or Dedicated Server account, you can set up and use custom name servers. For example, if your domain were example.com, you could use custom name servers named ns1.example.com and ns2.example.com.
Configuring custom name servers is a two-step process. First, you must add A records for the custom name servers (or verify that you already have functioning A records for the name servers). Second, you must register the custom name servers with the domain's registrar. Additionally, resellers must also submit a support ticket after completing these configuration steps so A2 Hosting Support can add the new custom name servers to the A2 Hosting DNS cluster.
Adding A records for the custom name servers
If you have a reseller hosting account, the first step for configuring custom name servers is to create DNS A records for the hosts.
If you have a managed VPS or managed Dedicated Server, you do not have to add any A records, because A2 Hosting sets them up for you. (Though if you want, you can view, set up, and modify the A records yourself in cPanel by using the Simple or Advanced DNS Zone Editor.) To verify that the A records are configured, you can ping the name servers by typing the following command at the command prompt. Replace example.com with your own domain name:
ping ns1.example.com
Alternatively, you can type the following command to view the A records, replacing example.com with your own domain name:
dig ns1.example.com
After you have verified that the A records are configured, you can register the custom name servers by following the procedure below. If you need further assistance, please open a support ticket with our Guru Crew on the Customer Portal at https://my.a2hosting.com.
To create the custom name server A records for a reseller account, follow these steps:
- Log in to WebHost Manager.
- From the WebHost Manager home screen, click DNS Functions, and then click DNS Zone Manager.
- Locate the primary domain for your account, and then click . The DNS zone information for the domain appears.
- Click Add Record.
- In the Valid zone name text box, type ns1. Leave the value 14400 in the TTL text box.
- In the Type list box, select A.
- In the IPv4 address text box, type 162.159.24.43.
- Click Save Record.
- Click Add Record.
- In the Valid zone name text box, type ns2. Leave the value 14400 in the TTL text box.
- In the Type list box, select A.
- In the IPv4 address text box, type 162.159.25.30.
- Click Save Record. You are now ready to register the name servers.
Registering the custom name servers
After you have verified that your domain has the correct A records configured, you can register the name servers. The procedure to do this depends on where you registered the domain.
Domains registered with A2 Hosting
If you registered your domain with A2 Hosting, follow these steps to register the custom name servers:
- Log in to the Customer Portal.If you do not know how to log in to the Customer Portal, please see this article.
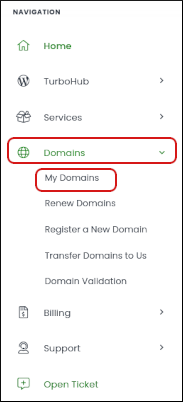
- In the Navigation sidebar, click Domains, and then click My Domains:

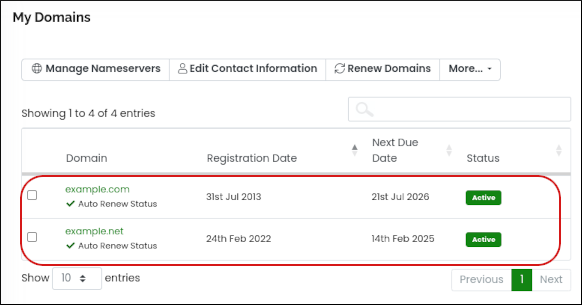
- In the domain list, click the domain that will use custom name servers:

In the Manage sidebar, click Private Nameservers:

If you are registering a name server for the first time, under Register a NameServer Name, in the Nameserver text box, type the name of the first name server. This is normally ns1.
Typically, name servers use names like ns1.example.com and ns2.example.com, where example.com represents your domain name.
In the IP Address text box, type the IP address associated with the name server.
For A2 Hosting VPS plans, you can find this information in the A2 Hosting Customer Portal at https://my.a2hosting.com.- Click .
- Repeat steps 5 to 7 for the second name server. Typically, the second name server is named ns2.
Domains registered with a third-party provider
The exact steps for registering custom name servers depend on the third-party provider that you are using.
However, generally, you can do this by logging in to the registrar's web interface and looking for an option similar to “Register custom nameservers” or “Register hostname”. If you cannot find where to do this, contact your registrar's technical support.
For example, for information about how to set up custom name servers for domains registered with GoDaddy, please visit this page.
Activating the custom name servers with A2 Hosting (resellers only)
The following step is only required for customers with reseller hosting accounts.
After you register the name servers with the third-party provider, go to the A2 Hosting Customer Portal at https://my.a2hosting.com and open a support ticket. Please let us know the names of the newly-configured custom name servers so we can add them to the A2 Hosting DNS cluster.
Article Details
- Product: Managed Dedicated Server Managed VPSReseller Hosting
- Level: Intermediate
Grow Your Web Business
Subscribe to receive weekly cutting edge tips, strategies, and news you need to grow your web business.
No charge. Unsubscribe anytime.
Did you find this article helpful? Then you'll love our support. Experience the A2 Hosting difference today and get a pre-secured, pre-optimized website. Check out our web hosting plans today.