How to set the name servers for a domain to point to A2 Hosting
This article provides information about how to set up a domain's name server settings to work with A2 Hosting's servers.
When to set your domain's name servers
If you already own a domain that you purchased from a different registrar or hosting company, you can change the name server (DNS) settings for the domain so they point to A2 Hosting's servers. (Billing and domain administration remain with the domain's current registrar.)
Setting your domain's name servers
When you change a domain's name server settings, you must specify at a minimum a primary name server and a secondary name server. This ensures that there is at least one alternate server available to provide DNS information about your site if one of the servers is unavailable.
The correct name servers for your domain depend on the type of account you have, and which A2 Hosting server hosts your account. You can view the name server information for your account on the A2 Hosting Customer Portal at https://my.a2hosting.com. Nameservers and their IP addresses are listed in the Product Details of each product.
For example, shared hosting accounts use ns1.a2hosting.com, ns2.a2hosting.com, ns3.a2hosting.com, and ns4.a2hosting.com as their name servers.
Almost all domain registrars provide a control panel where you can manage a domain's name server settings. If you are unable to make these changes, contact the domain's registrar and ask them how to change your domain's name server or DNS settings.
When you change a domain's name server settings or register a new domain, it generally takes 24 hours until the changes take full effect. This delay, known as DNS propagation delay, occurs with all hosts and is beyond our control. Therefore, until your domain fully resolves you cannot do the following:
- Visit your web site by going to the URL http://www.example.com, where example.com represents your domain name. In the meantime, however, you can view your web site using shared URLs or a custom hosts file. For information about how to do this, please see this article.
- Access your e-mail accounts. POP3, IMAP, SMTP, and webmail will not work until DNS propagation is complete.
Changing the name servers for a domain
To change the name servers for a domain, follow these steps:
- Log in to the Customer Portal.If you do not know how to log in to the Customer Portal, please see this article.
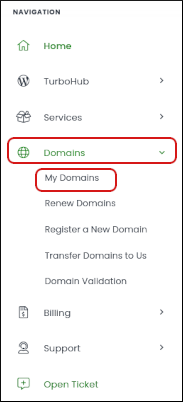
- In the Navigation sidebar, click Domains, and then click My Domains:

- Click the domain you want to configure.
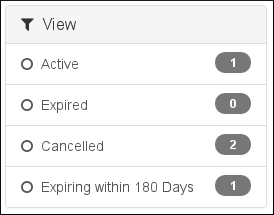
You can filter the list of domains to only display active, expired, canceled, or expiring domains. To do this, in the View sidebar, click the type of domain status you want to view:

- In the Manage sidebar, click Nameservers.
To use the default name servers, click Use default nameservers.
When you select this option, the nameserver values are set automatically to ns1.a2hosting.com, ns2.a2hosting.com, ns3.a2hosting.com, and ns4.a2hosting.com.To use custom name servers, click Use custom nameservers, and then type the name server names in the text boxes.
To manage DNS settings using the A2 Hosting Customer Portal, you must use custom name servers, and additionally set the nameservers to the following values:
- dns1.name-services.com
- dns2.name-services.com
- dns3.name-services.com
- dns4.name-services.com
- dns5.name-services.com
Click .
DNS changes can take 24 hours to fully propagate. For information about how to access your web site before DNS propagation is complete, please see this article.
More Information
For more information about DNS, please visit http://en.wikipedia.org/wiki/Domain_Name_System.
Article Details
- Level: Beginner
Grow Your Web Business
Subscribe to receive weekly cutting edge tips, strategies, and news you need to grow your web business.
No charge. Unsubscribe anytime.
Did you find this article helpful? Then you'll love our support. Experience the A2 Hosting difference today and get a pre-secured, pre-optimized website. Check out our web hosting plans today.