- Jan 27, 2021
 0
0- by A2 Marketing Team
Email can be a powerful way to connect with your audience. However, building a mailing list can seem daunting, particularly for startups, smaller businesses, and anyone who’s new to the world of email marketing.
Fortunately, WordPress supports many popular email marketing platforms. Whether it’s sharing exclusive discounts, notifying subscribers about new content, or re-engaging disconnected customers, WordPress and email marketing software can be a powerful combination.
In this article, we’ll show you how to connect the popular Mailchimp marketing platform to your WordPress account. Then, we’ll create an embeddable sign up form, so visitors can subscribe to your mailing list directly from your WordPress website. We have lots to cover, so let’s get started!
What Email Marketing Is (And Why You May Already Be Doing It)
Today, it’s difficult to imagine someone who doesn’t have an email address. It’s estimated that the number of email users in the U.S. will reach nearly 255 million by the end of 2020. Regardless of your target demographic, statistically your ideal customer already has at least one email address. If they have an email address, you can target them with email marketing.
Email marketing is the process of promoting your business, products, and services via email. This includes everything from your company newsletter, to messages about upcoming sales, and even exclusive discount codes that you email to your best customers.
Organizations in the U.S. spent over 350 million dollars on email advertising in 2019. This makes email marketing one of the most popular forms of marketing.
Your business may not have a formal marketing strategy. However, if you email your customers, you’re probably already performing some form of email marketing. With the exception of order confirmations and direct responses to customer queries, the majority of customer emails will most likely fall under the heading of email marketing.
If you’re already investing time and resources into email marketing, it’s a smart move to ensure you’re getting maximum return on your investment. For the best results, we recommend taking a more structured approach to email marketing. This involves creating a formal marketing strategy, and investing in email marketing and automation tools. This will help drive conversions and maximize sales, while minimizing the day-to-day workload for your marketing department.
Why Email Marketing Is Important for Your Business
Email is the most direct form of communication you have with your target audience. This makes email a powerful tool for marketing your products and services.
Most people check their inbox multiple times a day. According to the 2019 Adobe Email Usage Study, Americans spend over three hours per day checking their work email, and over two hours checking their personal email. That’s five hours every single day, where you could be connecting with your target audience.
A lot of attention is given to social media marketing and online influencers. However, there is evidence to suggest that your customers are spending far more time in their inbox, rather than social platforms such as Facebook, Twitter, and Instagram. In 2019, the average daily social media usage of Internet users came in at 144 minutes per day. That’s significantly less than the five hours the average American dedicates to email every single day.
In addition, emails remain in the customer’s inbox until they take some action. On social media, your marketing content can easily get buried in the user’s timeline.
Despite their popularity, there’s also no guarantee that your audience will have accounts on every social media platform. Today, there are a huge number of social platforms, from household names right through to more obscure brands.
With social media marketing, you may have to make tough decisions about the number of platforms you can realistically target. As a result, you may miss out on conversions. By contrast, a single email can potentially reach everyone on your mailing list – assuming you steer clear of their spam folder.
Email marketing can also be a great way to keep your visitors engaged. By regularly notifying customers about great new content or offers, you can help keep your site at the forefront of their mind.
An Introduction to Mailchimp
Mailchimp is a popular marketing automation and email marketing tool. It’s designed to help companies market their products via email, build lasting relationships with their customers, and ultimately transform leads into sales.
Mailchimp has a range of useful features for email marketers. This includes drag-and-drop editors that you can use to design beautiful, engaging emails without having to write code.
You can also use Mailchimp to create automated email campaigns. This includes email series that target specific subscribers. For example, you might create an onboarding series where various emails are sent to new subscribers, at specific intervals. This can help get new customers up to speed, without requiring manual intervention from your marketing team.
You can also use Mailchimp to monitor subscriber behavior. This is particularly useful for identifying and re-engaging disengaged customers. For example, if a subscriber doesn’t open three emails in a row, then Mailchimp can automatically send them an exclusive discount for your e-commerce store.
Mailchimp also has built-in analytics and reporting functionally. This enables you to analyze the effectiveness of your email marketing campaigns, and identify any opportunities to improve. By continuously refining your campaigns, you can help drive traffic and conversions.
There are a number of paid Mailchimp plans available. However, you can also use Mailchimp for free for up to 2,000 contacts. This means you can see whether Mailchimp is right for you, before purchasing a subscription. The free plan is also a good fit for smaller businesses, or anyone just getting started with email marketing.
If you don’t have a regular email marketing strategy, Mailchimp also has a Pay As You Go plan. This plan may be a good fit if you’re planning a one-off email campaign, where it wouldn’t necessarily make financial sense to purchase a subscription.
Why (And When) You’d Want to Add Mailchimp to WordPress
Mailchimp is a standalone email marketing and automation platform. However, you can also connect Mailchimp to your WordPress website. There are several key benefits to making this connection.
You can grow your email marketing lists, by adding a Mailchimp subscriber form to your WordPress website. Anyone who completes this form will be added to your Mailchimp mailing list. You can then target them as part of your email marketing campaigns.
You can even create a compressed subscriber form that you can add to your site’s recurring elements, such as the sidebar or footer. This ensures visitors can subscribe to your mailing list, from any page of your website.
After creating your subscriber form, you can use your site to drive conversions. This might include providing additional content for subscribers, such as blog posts or a members-only forum. You might also offer special discounts, such as a coupon code that’s emailed to new subscribers. You could even run a competition, where every new subscriber is entered into a prize draw.
Mailchimp also has a useful RSS campaign. This RSS feature will automatically send a summary of your latest blog posts to your subscribers. This can be an easy and effective way to keep visitors engaged, and drive more traffic to your website without requiring manual intervention from you, or your marketing team.
How to Connect Mailchimp to Your WordPress Website
Now we’ve explored the benefits of connecting Mailchimp to WordPress, it’s time to see how you’d make this connection. Let’s integrate your email automation platform and your website, in eight easy steps.
Step 1: Sign Up for a Mailchimp Account
To start, you’ll need to head over to Mailchimp and create an account. Once you’ve entered your information, Mailchimp will send an activation link to the email address you provided.
After activating your Mailchimp account, the next step is choosing your plan. There are several paid plans available, as well as a free plan. If you opt for the free plan, you’ll be capped at 2,000 contacts. However, you can always upgrade to a paid plan at a later date.
You will now have the option to connect your social media accounts to Mailchimp. This can be particularly useful if you plan to share your email marketing campaigns across multiple platforms.
Step 2: Create a Mailchimp Mailing List
Now you’ve set up your Mailchimp account, you’re ready to create your first mailing list. If you’ve previously dabbled in email marketing, you may already have some contacts. To get your mailing list off to the strongest possible start, we recommend uploading this information to Mailchimp.
Typically, the quickest method is to upload these contacts as a Comma-Separated Value (CSV) file. Once you’ve formatted your CSV file according to Mailchimp’s requirements, you just need to upload that file to Mailchimp, using the dedicated upload tool.
In Mailchimp’s left-hand menu, select the Audience icon. You can then select Audience dashboard.

Next, select Import Your Contacts > Upload file > Continue to Upload. Once you’ve completed the import process, you can review all your contacts by navigating to Audience > All contacts. Then, you can select Manage contacts > View contacts. You should now see a list of all your contacts.
Alternatively, you can copy/paste or manually type this information into Mailchimp. This method may be easier if you have a more modest contact list, or are unfamiliar with CSV formatting. To add your contacts manually, navigate to Audience > Audience dashboard > Import Your Contacts.
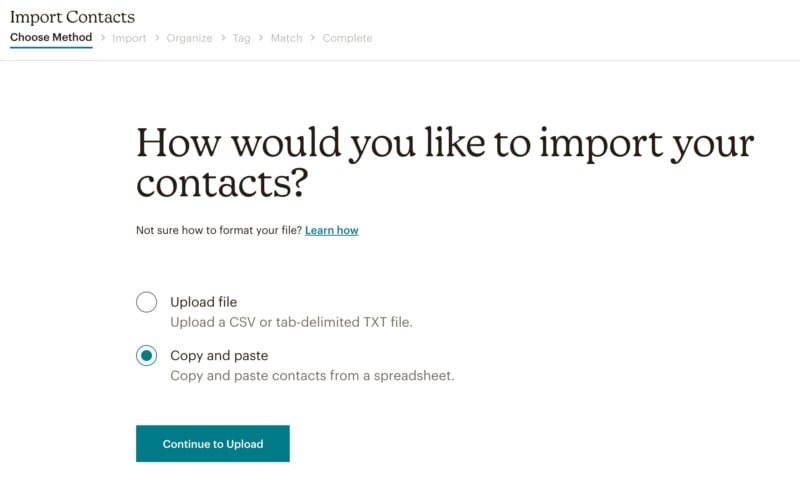
On the subsequent screen, you can input each contact. Regardless of whether you’re copy/pasting or typing, it’s important to follow Mailchimp’s formatting rules, as they’re shown onscreen.
Step 3: Connect to Your Mailchimp Account to WordPress
An API key is the secret to integrating Mailchimp with your WordPress website. This key is a unique identifier that grants applications and services access to your Mailchimp account. This is how we’ll create a connection between Mailchimp and your WordPress website.
To request an API key, log into your Mailchimp account. In the bottom-left corner, select your profile picture and then choose Account. On the subsequent screen, select Extras > API keys.
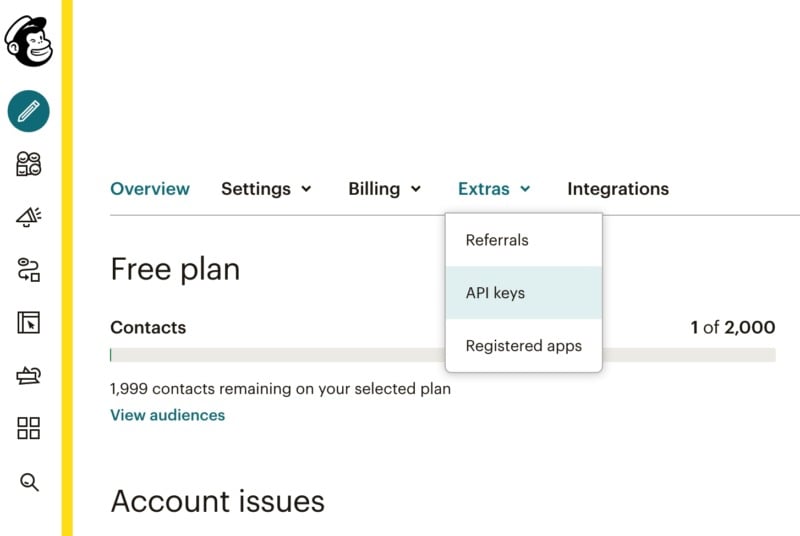
Under Your API Keys, select Create A Key. Mailchimp will now generate an API key.
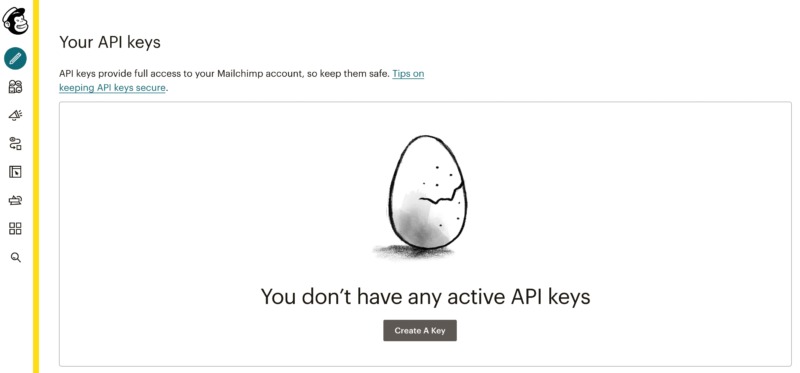
We’ll be using this information in the following step, so it’s a good idea to leave this page open in a separate tab. It’s also important to keep this key a secret, to ensure no-one gains access to the information in your Mailchimp account.
Step 4: Install the Mailchimp for WordPress plugin
Although you can use Mailchimp on your WordPress website without any extra tools, there are several plugins that can make the integration process easier. Some popular options include MailChimp Plugin for WordPress, and MailChimp Forms by MailMunch.
We’ll be using the Mailchimp for WordPress (MC4WP) plugin, as it can integrate with the existing forms on your WordPress website. It’s also compatible with a range of popular WordPress plugins, including WooCommerce, MemberPress, and Gravity Forms.
After activating this plugin, navigate to MC4P > Mailchimp in your WordPress dashboard. You can then enter the API key from your Mailchimp account, and click Save Changes.
After a few moments, you should see a Status: Connected message. You’ve now successfully connected your Mailchimp account and your WordPress website.
Step 5: Renew Your Mailchimp List
You can now access your Mailchimp data from the WordPress dashboard, including your subscriber lists. To view all your subscribers, select MC4P > Mailchimp in the WordPress dashboard.
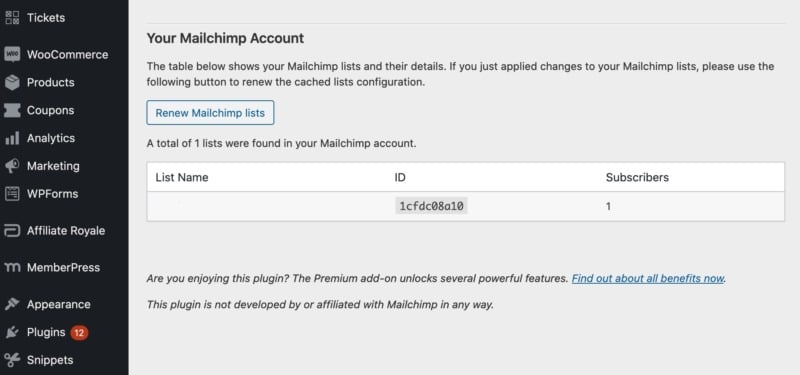
Since you’ve just connected your WordPress and Mailchimp accounts, we’d recommend pressing the Renew Mailchimp lists button. This will renew the cached lists configuration, and ensure you’re looking at the latest version of your Mailchimp data. It’s also worth pressing this button every time you make changes in your Mailchimp lists, just to ensure you’re seeing up-to-date information.
Step 6: Build a Mailchimp Signup Form to Your Website
Now, visitors can subscribe to your Mailchimp mailing list, directly from your website. To grow your mailing list, it’s a good idea to add at least one subscription form to your WordPress website.
An embedded form is particularly useful for encouraging signups, without disrupting the visitor experience. To create an embedded form, switch back to the Mailchimp dashboard, then select the Audience icon. Next, navigate to Audience dashboard > Manage Audience > Signup forms.
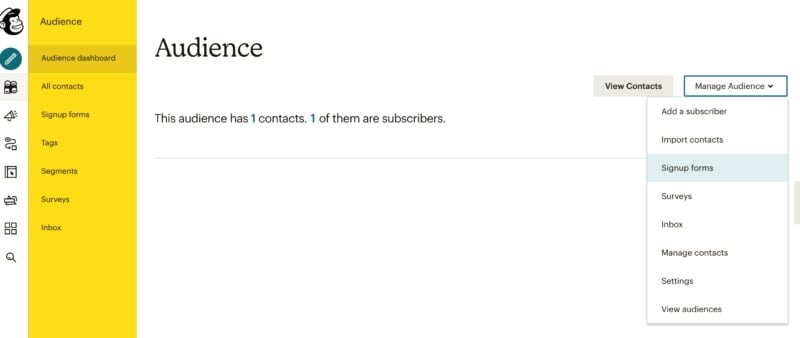
Find Embedded forms, and give its accompanying Select button a click. You can now choose from several styles: Classic, Condensed, Horizontal, or Unstyled.
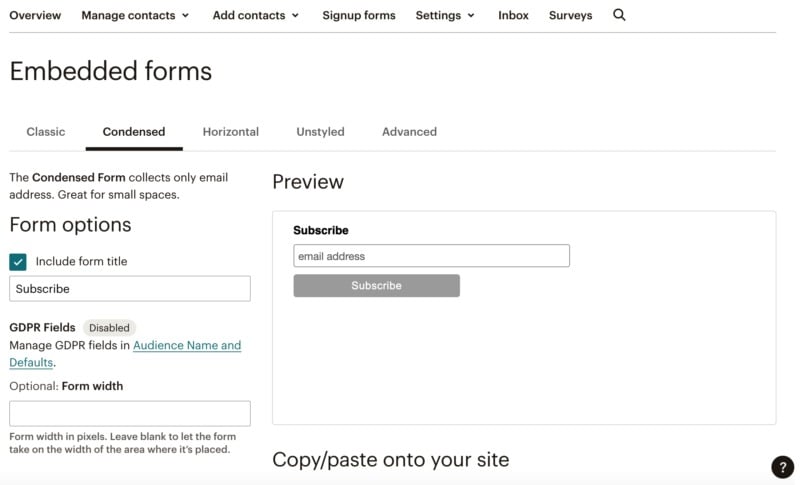
Depending on your selection, you’ll now have access to various editing settings. For example, you can change the form’s title, or display mandatory fields only. It’s worth spending some time experimenting, to see what different effects you can create.
Mailchimp will generate an embed code automatically. When you’re happy with the signup form you’ve created, copy this code.
Step 7: Add Your Mailchimp Signup Form to WordPress
To add a Mailchimp form to your website, switch over to the WordPress dashboard. You can position this form anywhere on your site, including adding it to specific pages or posts, or featuring it in recurring elements such as sidebars.
To add the form to a specific page or post, open that page or post for editing. You can then create a new Custom HTML block, and add your embed code.
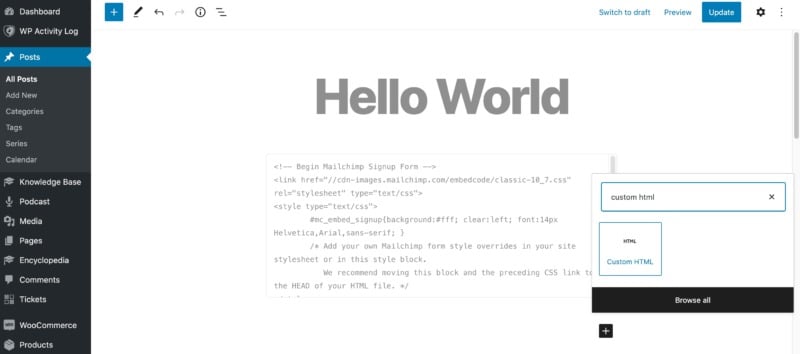
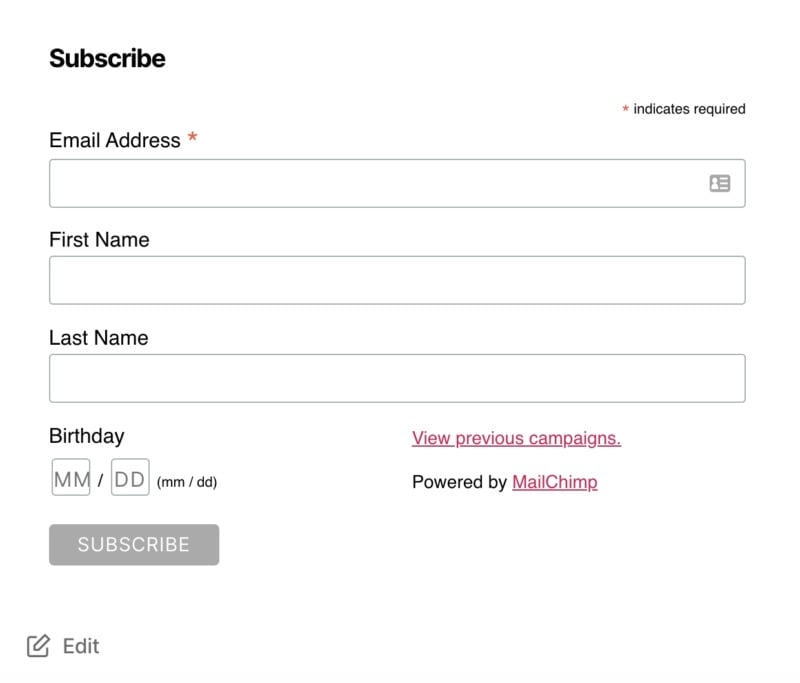
Once you publish your page or post, your Mailchimp signup form will appear on your WordPress website.
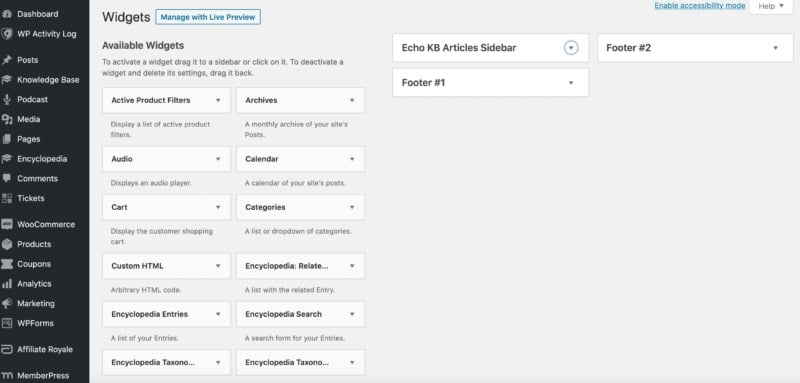
You can also feature this signup form in your site’s recurring elements. One option is to add the signup form to your sidebar using a widget. In your WordPress account, navigate to Appearance > Widgets.
You can then select the Custom HTML widget, and drag it to the Sidebar or Footer column(s). Note that the available options may vary depending on your WordPress theme.
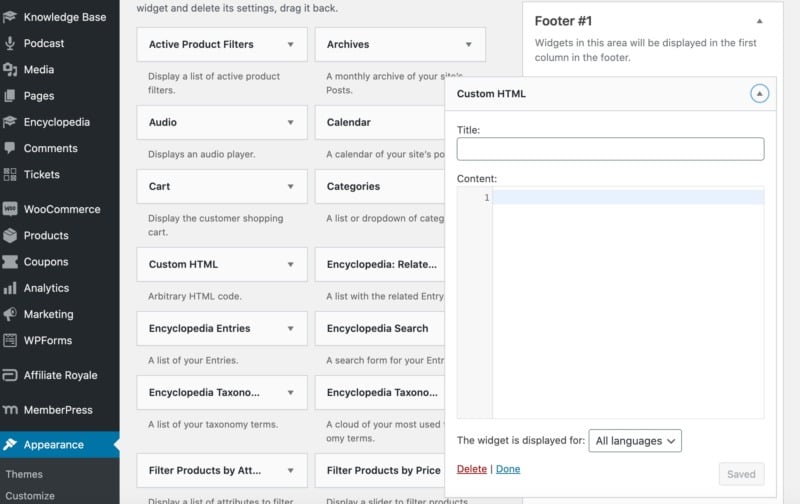
Now, click to expand your custom HTML widget. You can then copy/paste Mailchimp’s embed code into the popup that appears.
The Mailchimp signup form will now appear across your website, as part of your theme’s sidebar.
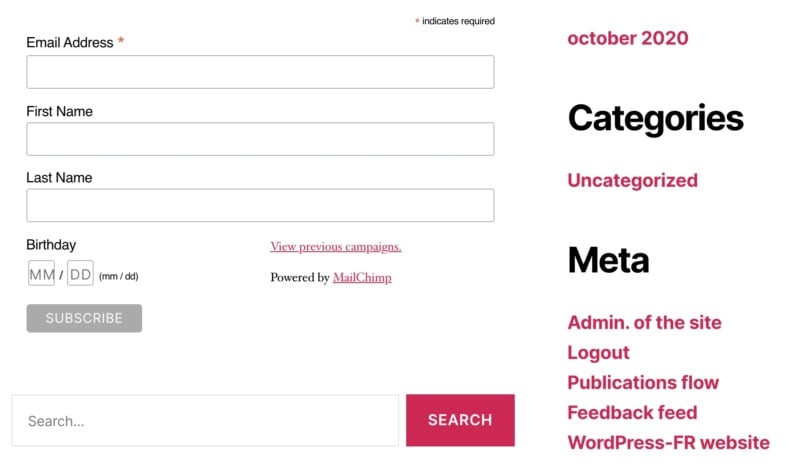
This is great for encouraging visitors to join your mailing list, without disrupting the visitor experience. Now that visitors can subscribe to your mailing list, the next step is to ensure you’re sending them regular email updates.
Step 8: Set Up a WordPress RSS Feed Newsletter in Mailchimp
Mailchimp can automatically send your latest blog posts to your subscribers. This kind of RSS newsletter is a great way to keep your audience engaged, and can help re-engage any disinterested subscribers.
To setup an RSS to Email campaign, switch over to your Mailchimp account. You can then select Automations > Customer journey. In the upper-right corner, select Create > Classic Automations.

In the subsequent popup, make sure the Automated tab is selected. Choose Share Blog Updates.
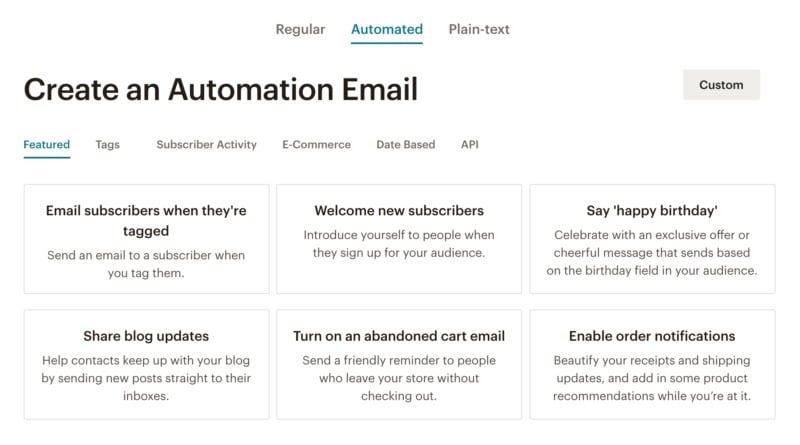
Now, give your campaign a descriptive name, and choose who should receive these updates. You’ll now need to enter the URL of your website’s RSS feed, and specify the days and times when Mailchimp should send its RSS newsletters. Note that Mailchimp will only send an email when you have new content to promote.
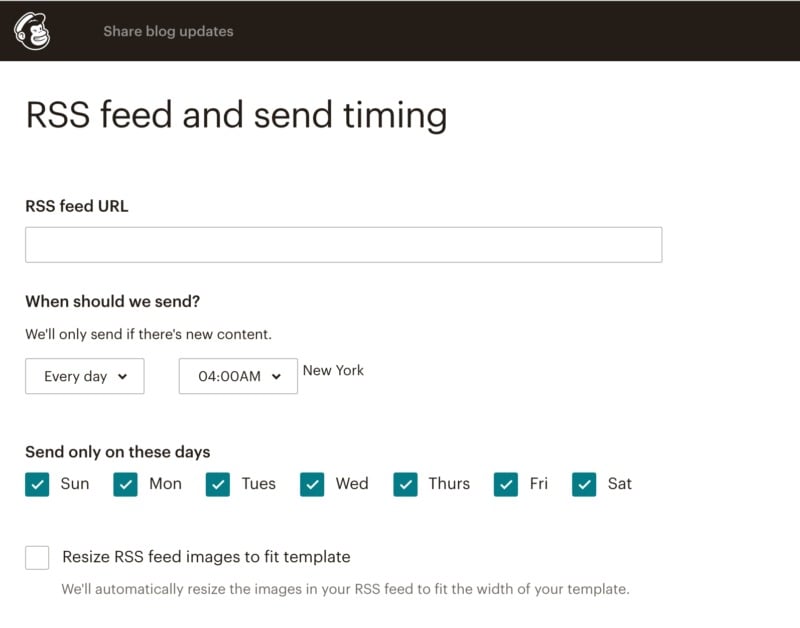
You can now build your email, and configure some additional options. These settings include enabling Google Analytics tracking, auto-tweeting your updates, and automatically converting any embedded videos into Mailchimp’s email-friendly video merge tags. There’s lots to explore here, so it’s worth taking some time to see what’s on offer.
When you’re ready to proceed, click Next. You can now choose the template that you want to use. Regardless of the template you select, you’ll be able to customize it using Mailchimp’s built-in editor.
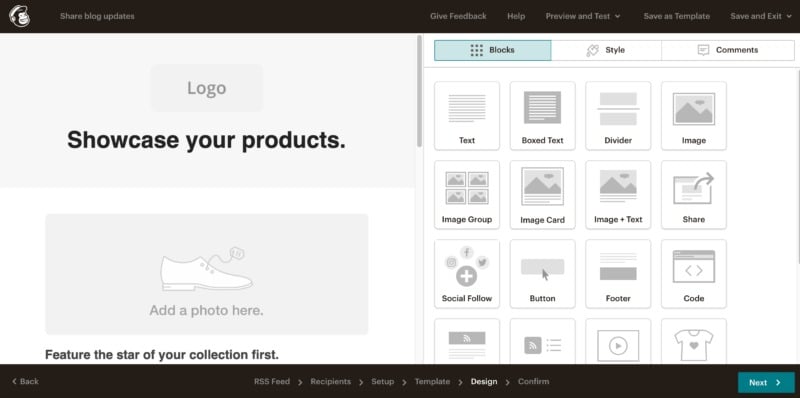
Select Next, and Mailchimp will display a preview of your RSS newsletter campaign. You can review this information, and make any required changes.
Once you’re happy with your campaign, click Start RSS. Now, everyone on your mailing list will receive email updates about new content you publish on your WordPress website.
Conclusion
Email is one of the most powerful ways to market your business, drive traffic, and ultimately increase conversions. By using a powerful email marketing and automation platform such as Mailchimp, you can get your email marketing strategy off to the best possible start, and grow your mailing list.
By connecting Mailchimp to your WordPress website, visitors will be able to subscribe to your mailing list, potentially from any page of your website. You can even use Mailchimp to create an RSS email campaign that automatically notifies your subscribers about all the new content you’re posting over at your blog.
A successful email marketing campaign can significantly boost your traffic, so you’ll want to make sure your site is prepared. This includes choosing a hosting provider who can help you manage large volumes of traffic. For the best results, we recommend a flexible hosting provider that gives you the option to temporarily upgrade during times of high traffic.
Image credits: Pexels.
