How to change the WordPress language
This article describes how to change the language in WordPress.
About WordPress language support
As the most popular blogging platform in use today, WordPress is used all over the world. Part of the reason for WordPress' popularity is its support for many languages.
By default, a WordPress installation uses English as its language, but there are several ways to install other languages:
- Softaculous: Softaculous enables you to select a language during WordPress installation. If you are installing a new WordPress site using Softaculous, this is the easiest way to install your preferred language.
- Manual installation: Your account may not include Softaculous, or Softaculous may not have the language you want. Or you may want to install a language on an existing WordPress site. In these scenarios, you can install language files manually to change the WordPress language. For information about how to do this, please see the procedure below.
- Plugin: As an alternative to manual installation, you can use a plugin to change the WordPress language. For information about how to do this, please see the procedure below.
Changing the WordPress language manually
To change the language in WordPress manually, you download the translation file (or files) for your language, upload them to your WordPress site, and configure some settings. To do this, follow these steps:
- Use your web browser to go to https://translate.wordpress.org/languages. This page displays WordPress languages and locales. Use the values in the Language code column to determine the code for the language that you want to use.
- Use your web browser to go to http://i18n.svn.wordpress.org. This site is the source repository for all of the WordPress language files. Use the language code that you obtained in step 1 to determine which directory contains the files for the language you want to use.
- Click the language code name (for example, fr_FR) to view the directory contents, and then click the tags directory.
- This step varies for each language. The tags directory contains directories for various WordPress versions. Start with the most recent version number, and look for the messages subdirectory. If the messages subdirectory does not exist, move on to the previous version number until you find it.
- In the messages directory, download the .mo language file or files to your local computer.
Depending on the language, there may be only one .mo file, or there may be multiple .mo files. Also, you do not need any of the .po source files unless you plan on modifying the translations yourself.
- Upload the .mo file or files to the wp-content/languages directory of your WordPress site.
If the languages directory does not exist in the wp-content directory, create it first, and then upload the files.
- Enable the new language in the WordPress settings:
- If you are using WordPress version 4.0 or newer, log in to the WordPress administration interface. Click Settings, and then click General. In the Site Language list box, select the language you want WordPress to use, and then click .
- If you are using WordPress version 3.9.2 or older, open the wp-config.php file in your preferred text editor. Locate the following line, replacing xx_YY with the language and locale code (this code matches the language code directory name that you used in step 3):
define ('WPLANG', 'xx_YY');Save the changes to the wp-config.php file.
- View the WordPress site in your web browser. WordPress displays text using the new language.
Changing the WordPress language using a plugin
If you do not want to install WordPress languages manually, there are several WordPress plugins that simplify the process. One of the most popular plugins is WordPress Language. This plugin automatically downloads and installs the correct language files, and enables you to switch quickly and easily between languages.
To install and configure the WordPress Language plugin, follow these steps:
- Log in to your WordPress site as the administrator.
- In the left-hand pane, click Plugins.
- Click .
- In the Search text box, type wordpress language, and then click .
- In the Name column, locate WordPress Language, and then click Install Now.
- After WordPress finishes installing the plugin, click Activate Plugin.
- After the plugin is activated, a language selection menu appears in the top menu bar of the administration interface:
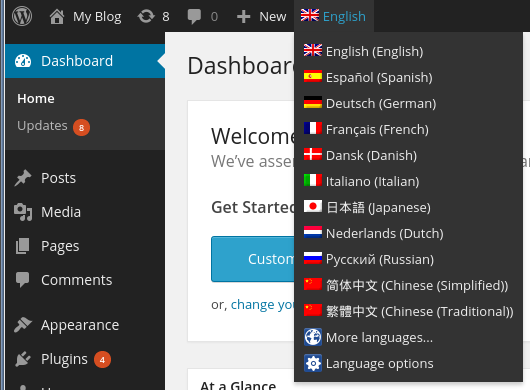
To change the WordPress language, select the language you want to use, and then click Switch language. If you do not see the language you want, click More languages to view additional language options.
The Switch language text varies based on the current language (for example, if the current language is French, WordPress displays Changer de langue).- The new language settings take effect immediately.
More Information
For more information about language support in WordPress, please visit http://codex.wordpress.org/WordPress_in_Your_Language.
Article Details
- Level: Beginner
Did you find this article helpful? Then you'll love our support. Experience the A2 Hosting difference today and get a pre-secured, pre-optimized website. Check out our web hosting plans today.